Prérequis :
- Serveur sql01.house.cpb IP 192.168.1.62
- Serveur sql02.house.cpb IP 192.168.1.63
Dans le DNS :
- sql.house.cpb. IN A 192.168.1.62
- sql.house.cpb. IN A 192.168.1.63
1° ) Installation Base de données/PhpMyadmin (ql01.house.cpb/sql02.house.cpb)
root@sql01:/home/sysbreak# apt-get install mysql-server mysql-client
root@sql01:/home/sysbreak# systemctl enable mariadb.service
root@sql01:/home/sysbreak# systemctl start mariadb.service
Configuration
root@sql01:/home/sysbreak# mysql_secure_installation

NOTE: RUNNING ALL PARTS OF THIS SCRIPT IS RECOMMENDED FOR ALL MariaDB
SERVERS IN PRODUCTION USE! PLEASE READ EACH STEP CAREFULLY!
In order to log into MariaDB to secure it, we'll need the current
password for the root user. If you've just installed MariaDB, and
you haven't set the root password yet, the password will be blank,
so you should just press enter here.

Enter current password for root (enter for none): « ENTER »
OK, successfully used password, moving on...

Setting the root password ensures that nobody can log into the MariaDB
root user without the proper authorisation.
Set root password? [Y/n] yes
New password:
Re-enter new password:
Password updated successfully!
Reloading privilege tables..
... Success!

By default, a MariaDB installation has an anonymous user, allowing anyone
to log into MariaDB without having to have a user account created for
them. This is intended only for testing, and to make the installation
go a bit smoother. You should remove them before moving into a
production environment.
Remove anonymous users? [Y/n] y
... Success!

Normally, root should only be allowed to connect from 'localhost'. This
ensures that someone cannot guess at the root password from the network.
Disallow root login remotely? [Y/n] n
... skipping.

By default, MariaDB comes with a database named 'test' that anyone can
access. This is also intended only for testing, and should be removed
before moving into a production environment.
Remove test database and access to it? [Y/n] n
... skipping.

Reloading the privilege tables will ensure that all changes made so far
will take effect immediately.
Reload privilege tables now? [Y/n] y
... Success!
Cleaning up...

All done! If you've completed all of the above steps, your MariaDB
installation should now be secure.
Thanks for using MariaDB!
Installer PhpMyAdmin
root@sql01:/etc# apt install phpmyadmin

« apache2 »

« oui »

« Taper un mot de passe »

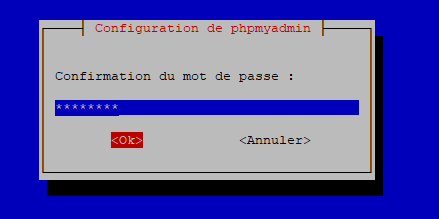
« Confirmer le mot de passe »
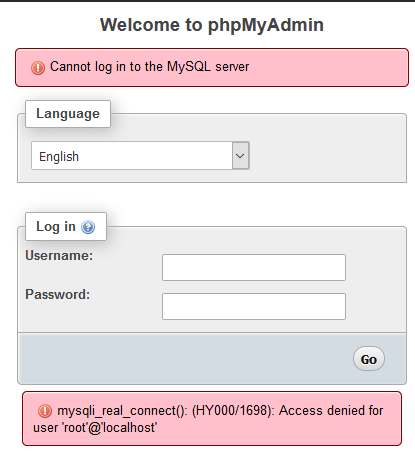
Régler le Souci suivant :

root@sql01:/etc/apache2# mysql --user=root mysql
Reading table information for completion of table and column names
You can turn off this feature to get a quicker startup with -A

Welcome to the MariaDB monitor. Commands end with ; or \g.
Your MariaDB connection id is 16
Server version: 10.1.38-MariaDB-0+deb9u1 Debian 9.8

Copyright (c) 2000, 2018, Oracle, MariaDB Corporation Ab and others.

Type 'help;' or '\h' for help. Type '\c' to clear the current input statement.

MariaDB [mysql]> use mysql;
Database changed
MariaDB [mysql]> update user set plugin='' where User='root';
Query OK, 1 row affected (0.00 sec)
Rows matched: 1 Changed: 1 Warnings: 0

MariaDB [mysql]> flush privileges;
Query OK, 0 rows affected (0.00 sec)

MariaDB [mysql]> exit;
2°) Modifier les Fichier Systèmes my.cnf pour les Deux Servers SQL01 et SQL02
Pour le Serveur SQL01
chris@sql01:/etc/mysql$ vi my.cnf
Ajouter les Lignes Suivantes
[mysqld]
server_id = 1
log_bin = /var/log/mysql/mysql-bin.log
log_bin_index = /var/log/mysql/mysql-bin.log.index
relay_log = /var/log/mysql/mysql-relay-bin
relay_log_index = /var/log/mysql/mysql-relay-bin.index
expire_logs_days = 10
max_binlog_size = 100M
log_slave_updates = 1
auto-increment-increment = 2
auto-increment-offset = 1
éditer le fichier 50-server.conf
chris@sql01:/etc/mysql$ vi ./mariadb.conf.d/50-server.cnf
Modifier la bind-address
bind-address = 192.168.1.62 (Adresse du Serveur SQL01)
Redémarrer le serveur de base de données.
Pour le Serveur SQL02
chris@sql02:/etc/mysql$ vi my.cnf
#Ajouter les Lignes Suivantes
[mysqld]
server_id = 2
log_bin = /var/log/mysql/mysql-bin.log
log_bin_index = /var/log/mysql/mysql-bin.log.index
relay_log = /var/log/mysql/mysql-relay-bin
relay_log_index = /var/log/mysql/mysql-relay-bin.index
expire_logs_days = 10
max_binlog_size = 100M
log_slave_updates = 1
auto-increment-increment = 2
auto-increment-offset = 2
éditer le fichier 50-server.conf
chris@sql02:/etc/mysql$ vi ./mariadb.conf.d/50-server.cnf
Modifier la bind-address
bind-address = 192.168.1.63 (Adresse du Serveur SQL02)
Redémarrer le serveur de base de données.
Vérifier que les deux server SQL01 et SQL02 écoute sur leurs adresses IP et non Localhost

3°) Création du compte ‘replication’ pour la réplication (à faire sur les deux bases)
Sur Sql01
On va créer un compte user ‘replication’ avec l’IP de SQL02 (192.168.1.63)
GRANT REPLICATION SLAVE ON *.* TO ‘replication’@’192.168.1.63’ IDENTIFIED BY ‘replication@2019’;
root@sql01:/etc# mysql -u root –p
Enter password: « PASWORD »

Welcome to the MariaDB monitor. Commands end with ; or \g.
Your MariaDB connection id is 7
Server version: 10.1.38-MariaDB-0+deb9u1 Debian 9.8
Copyright (c) 2000, 2018, Oracle, MariaDB Corporation Ab and others.
Type 'help;' or '\h' for help. Type '\c' to clear the current input statement.

MariaDB [(none)]> GRANT REPLICATION SLAVE ON *.* TO 'replication'@'192.168.1.63' IDENTIFIED BY 'replication@2019';
Query OK, 0 rows affected (0.00 sec)
Sur Sql02
On va créer un compte user ‘replication’ avec l’IP de SQL01 (192.168.1.62)
GRANT REPLICATION SLAVE ON *.* TO ‘replication’@’192.168.1.62’ IDENTIFIED BY ‘replication@2019’;
root@sql01:/etc# mysql -u root –p
Enter password: « PASWORD »

Welcome to the MariaDB monitor. Commands end with ; or \g.
Your MariaDB connection id is 7
Server version: 10.1.38-MariaDB-0+deb9u1 Debian 9.8
Copyright (c) 2000, 2018, Oracle, MariaDB Corporation Ab and others.
Type 'help;' or '\h' for help. Type '\c' to clear the current input statement.

MariaDB [(none)]> GRANT REPLICATION SLAVE ON *.* TO 'replication'@'192.168.1.62' IDENTIFIED BY 'replication@2019';
Query OK, 0 rows affected (0.00 sec)
Faire un test Croisé sur les deux bases afin de vérifier que les deux bases puissent se connecter entre elles via le compte ‘replication’
Ex : on est sur sql02 et on se connecte sur ma base SQL01 avec le compte ‘replication’*’192.168.1 .62’

4°) Réaliser la Réplication Master – Master entre les Deux bases
MASTER SQL02
Sur SQL01 Récupérer le Status MASTER
root@sql01:/etc/mysql# mysql -u root -p
Enter password: « PASWORD »
Welcome to the MariaDB monitor. Commands end with ; or \g.
Your MariaDB connection id is 17
Server version: 10.1.38-MariaDB-0+deb9u1 Debian 9.8
Copyright (c) 2000, 2018, Oracle, MariaDB Corporation Ab and others.
Type 'help;' or '\h' for help. Type '\c' to clear the current input statement.

MariaDB [(none)]> SHOW MASTER STATUS;
+------------------+----------+--------------+------------------+
| File | Position | Binlog_Do_DB | Binlog_Ignore_DB |
+------------------+----------+--------------+------------------+
| mysql-bin.000004 | 1045 | | |
+------------------+----------+--------------+------------------+
1 row in set (0.00 sec)
MariaDB [(none)]>
Sur SQL02 intégrer le status MASTER SQL01
A passer dans la requête sur SQL02 ci-dessous
- Mot de passe réplication de SQLO1
- IP de SQL01
- Master_log_file de SQL01 (ci-dessus)
- Master_log_pos de SQL01 (ci-dessus)
root@sql02:/etc/mysql/mariadb.conf.d# mysql -u root -p
Enter password: « PASWORD »

Welcome to the MariaDB monitor. Commands end with ; or \g.
Your MariaDB connection id is 36
Server version: 10.1.38-MariaDB-0+deb9u1 Debian 9.8
Copyright (c) 2000, 2018, Oracle, MariaDB Corporation Ab and others.
Type 'help;' or '\h' for help. Type '\c' to clear the current input statement.

MariaDB [(none)]> STOP SLAVE;
Query OK, 0 rows affected, 1 warning (0.00 sec)

MariaDB [(none)]> CHANGE MASTER TO master_host='192.168.1.62' , master_port=3306, master_user='replication' , master_password='replication@2019',master_log_file='mysql-bin.000004',master_log_pos=1045;
Query OK, 0 rows affected (0.05 sec)

MariaDB [(none)]> START SLAVE;
Query OK, 0 rows affected (0.00 sec)
MASTER SQL01
Sur SQL02 Récupérer le Status MASTER
root@sql02:/etc/mysql# mysql -u root -p
Enter password:

Welcome to the MariaDB monitor. Commands end with ; or \g.
Your MariaDB connection id is 17
Server version: 10.1.38-MariaDB-0+deb9u1 Debian 9.8
Copyright (c) 2000, 2018, Oracle, MariaDB Corporation Ab and others.
Type 'help;' or '\h' for help. Type '\c' to clear the current input statement.

MariaDB [(none)]> SHOW MASTER STATUS;
+------------------+----------+--------------+------------------+
| File | Position | Binlog_Do_DB | Binlog_Ignore_DB |
+------------------+----------+--------------+------------------+
| mysql-bin.000002 | 1045 | | |
+------------------+----------+--------------+------------------+
A passer dans la requête sur SQL01 ci-dessous1 row in set (0.00 sec)
MariaDB [(none)]>
Sur SQL01 intégrer le status MASTER SQL02
- Mot de passe réplication de SQL02
- IP de SQL02
- Master_log_file de SQL02 (ci-dessus)
- Master_log_pos de SQL02 (ci-dessus)
root@sql01:/etc/mysql/mariadb.conf.d# mysql -u root -p
Enter password:« PASWORD »

Welcome to the MariaDB monitor. Commands end with ; or \g.
Your MariaDB connection id is 36
Server version: 10.1.38-MariaDB-0+deb9u1 Debian 9.8
Copyright (c) 2000, 2018, Oracle, MariaDB Corporation Ab and others.
Type 'help;' or '\h' for help. Type '\c' to clear the current input statement.

MariaDB [(none)]> STOP SLAVE;
Query OK, 0 rows affected, 1 warning (0.00 sec)

MariaDB [(none)]> CHANGE MASTER TO master_host='192.168.1.63' , master_port=3306, master_user='replication' , master_password='replication@2019',master_log_file='mysql-bin.000002',master_log_pos=1045;
Query OK, 0 rows affected (0.05 sec)

MariaDB [(none)]> START SLAVE;
Query OK, 0 rows affected (0.00 sec)
5°) Test de la Réplication – Création BASE et TABLE
Créer une Table sur SQL01 cela devrait créer la même table sur SQL02
Sur SQL01
MariaDB [(none)]> create database chris;
Query OK, 1 row affected (0.00 sec)

MariaDB [(none)]> create table chris.flowers (`id` varchar(10));
Query OK, 0 rows affected (0.02 sec)
Sur SQL02
MariaDB [(none)]> show tables in chris;
+-----------------+
| Tables_in_chris |
+-----------------+
| flowers |
+-----------------+
1 row in set (0.00 sec)
La table se retrouve à présent aussi sur SQL02.
6°) Test suppession TABLE – Création BASE et TABLE
Supprimer la table ‘chris.flowers’ sur SQL02 er vérifions la suppression sur SQL01.
Sur SQL02
MariaDB [(none)]> drop table chris.flowers;
Query OK, 0 rows affected (0.01 sec)

Sur SQL01
MariaDB [(none)]> show tables in chris;
Empty set (0.00 sec)
La table « chris » est vide donc la réplication fonctionne.
7°) Affichage dans PhpMyAdmin
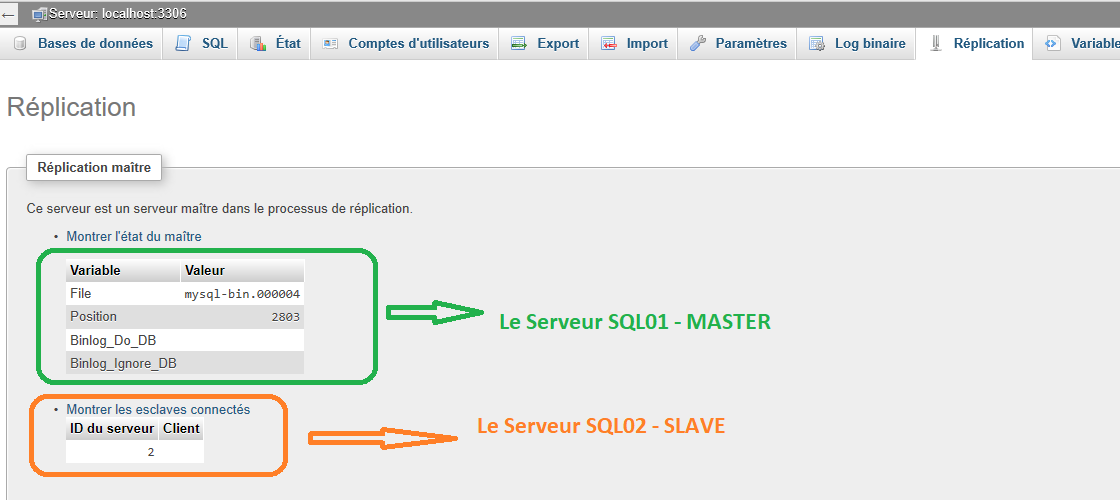
Affichage PhpMyadmin SQL01

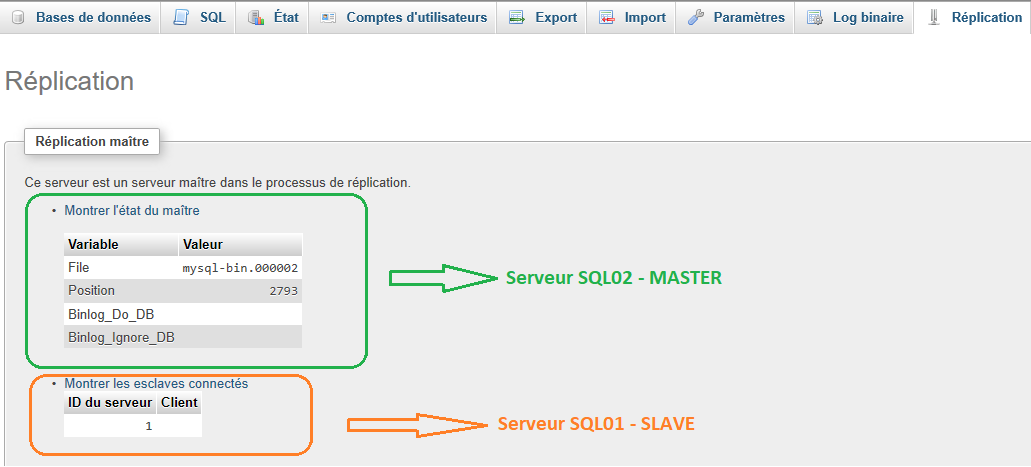
Affichage PhpMyadmin SQL02

Views: 12

