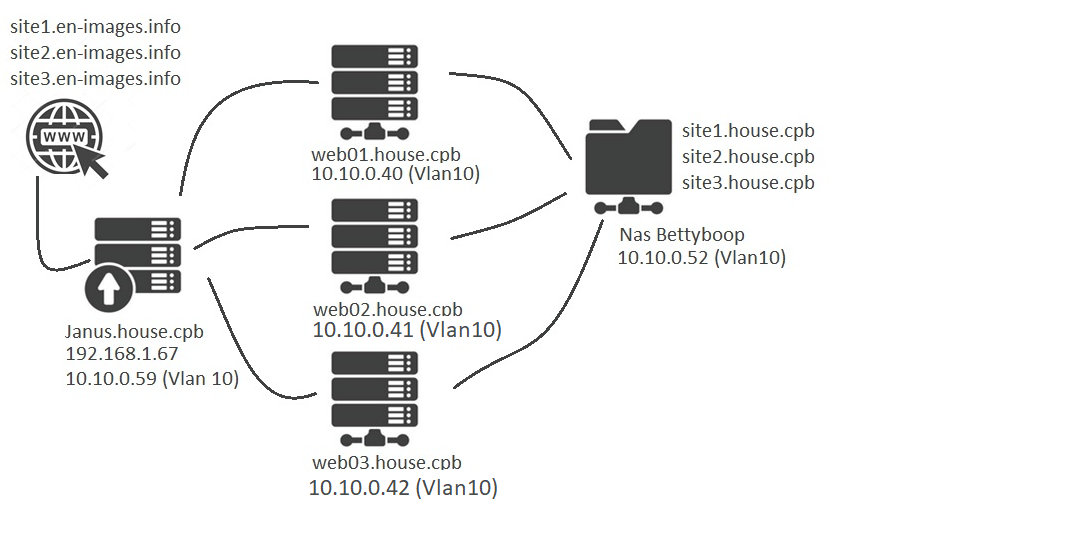
Réseau Privé Subnet 10.10.0.0/24
- Serveur WEB n°1 : 10.10.0.40 (web01.house.cpb)
- Serveur WEB n°2 : 10.10.0.41 (web02.house.cpb)
- Serveur Web n°3 : 10.10.0.42 (web03.house.cpb)
Réseau Local 192.168.1.0/24 et passerelle sur réseau Privé Subnet 10.10.0.0/24
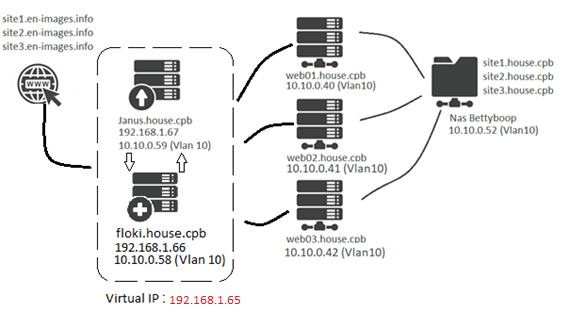
- Server Load Balancing : 192.168.1.67 et 10.10.0.59 (janus.house.cpb) Multi Site (VirtualHost)
Spécification de l’infrastructure.
- 3 sites seront hébergés sur les Machines WEB (VirtualHost)
- site1.en-images.info
- site2.en-images.info
- site3.en-images.info
- Montage NFS
- /home/www
- /home/conf.d
Mise en place dans la zone DNS de notre « register » les 3 sites sur notre domaine « en-images.info »

La résolution est déléguée par la zone DNS « en-images.info » hébergé sur OVH.
1°) Installation de la machine LoadBalancing Janus.house.cpb
Installer un Machine Virtuelle « janus.house.cpb » en Mode Proxy « LoadBalancing »
L’OS choisi sera Linux Debian
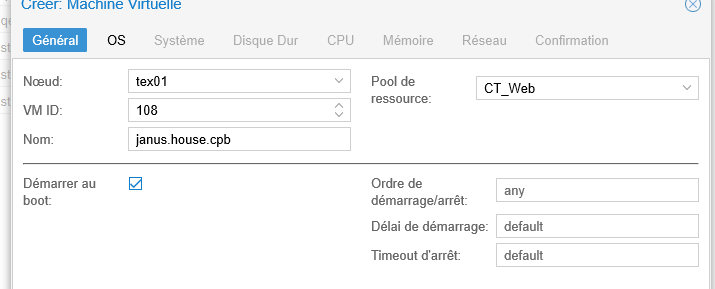

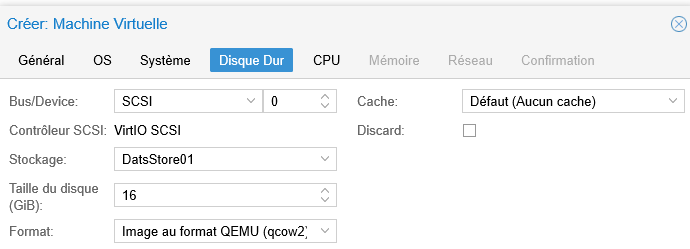


Démarrer la machine et modifier les paramètres
Modifier l’host machine
[cp219538@pc-xxx ~]$ vi /etc/hostname

Passer la VM en IP Statiques
root@pc-165:/home/chris# vi /etc/network/interfaces
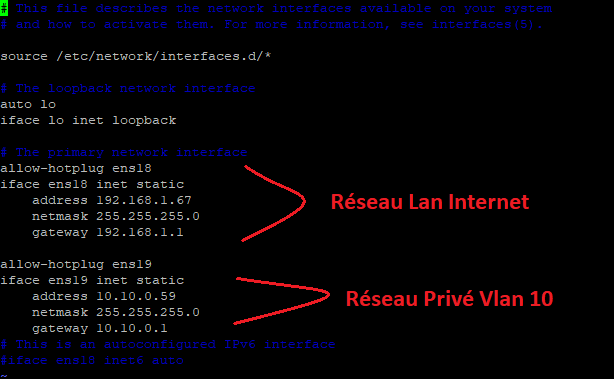
- Le réseau Lan « Internet » est connecté sur le vSwitch -> vmbr0
- Le réseau Privé Vlan10 est connecté sur le vSwitch -> vmbr1

Installer les outils suivants pour la VM janus
[cp219538@web01 ~]$ apt update
[cp219538@web01 ~]$ apt install qemu-guest-agent nmap net-tools
Installation nginx pour le loadBalancing
root@janus:/home/chris# apt-get install nginx
root@janus:/home/chris# cd /etc/nginx/

root@janus:/etc/nginx# ln -s /etc/nginx/sites-available/vhost /etc/nginx/sites-enabled/vhost

root@janus:/etc/nginx# systemctl enable nginx
root@janus:/etc/nginx# systemctl start nginx

Créer les fichiers « load-balancer »
root@janus:/etc/nginx# touch site1-load-balancer.conf
root@janus:/etc/nginx# touch site2-load-balancer.conf
root@janus:/etc/nginx# touch site3-load-balancer.conf
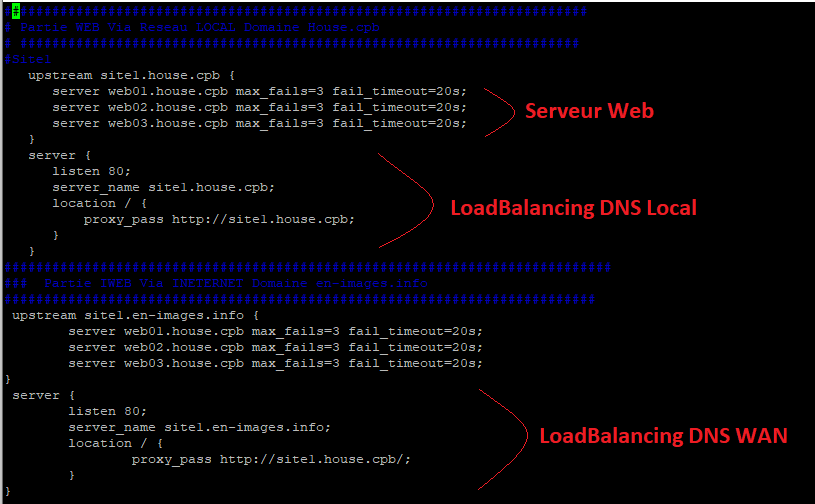
Pour le site1 (site1.en-images.info et site1.house.cpb)
root@janus:/etc/nginx# vi site1-load-balancer.conf
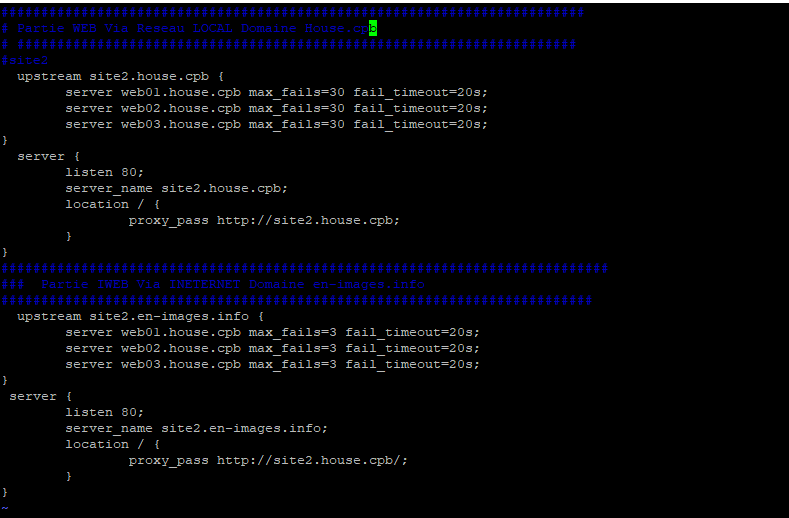
Pour le site2 (site2.en-images.info et site2.house.cpb)
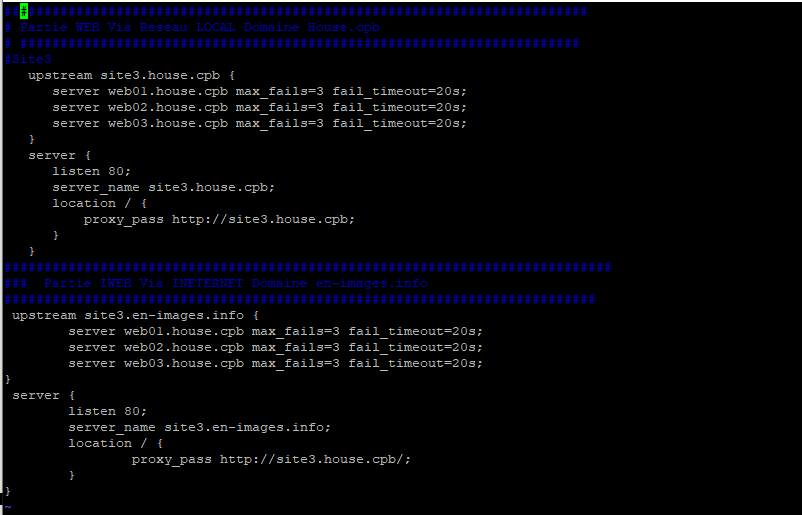
Pour le site3 (site3.en-images.info et site3.house.cpb)
Editer le fichier /etc/hosts et ajouter les Hosts Webxx

Effacer le fichier par default
root@janus:/etc/nginx/conf.d# rm /etc/nginx/sites-enabled/default
Redémarrer le proxy reverse nginx.
root@janus:/etc/nginx/conf.d# service nginx stop
root@janus:/etc/nginx/conf.d# service nginx start
A présent il faut rediriger les requêtes de notre Routeur Oranger vers la machine « janus.house.cpb » qui nous sert de « LoadBalancing » de charge et de disponibilité.
Côté DNS Orange
![]()
Côté NAT Orange
![]()
2°) Installation de la machine web01.house.cpb (modéle pour web02 et web03)
L’OS choisi sera Centos7
- Host : web01.house.cpb
- IP Réseau Lan : 192.168.1.40 (vmbr0)
- IP Réseau Privé : 10.10.0.40 (vmbr1)


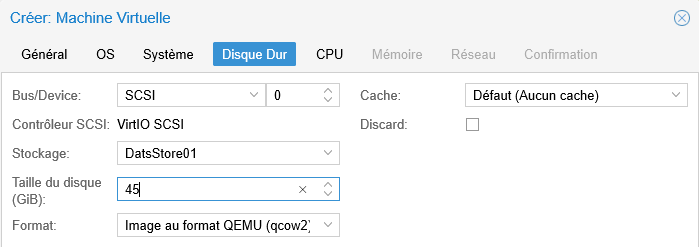


Ajouter une carte réseau net1 supplémentaire et la connectée sur le vSwitch vmbr1.
Vmbr1 correspond au Réseau Vlan10 Privé des machines virtuelles.

Démarrer et installer Centos7
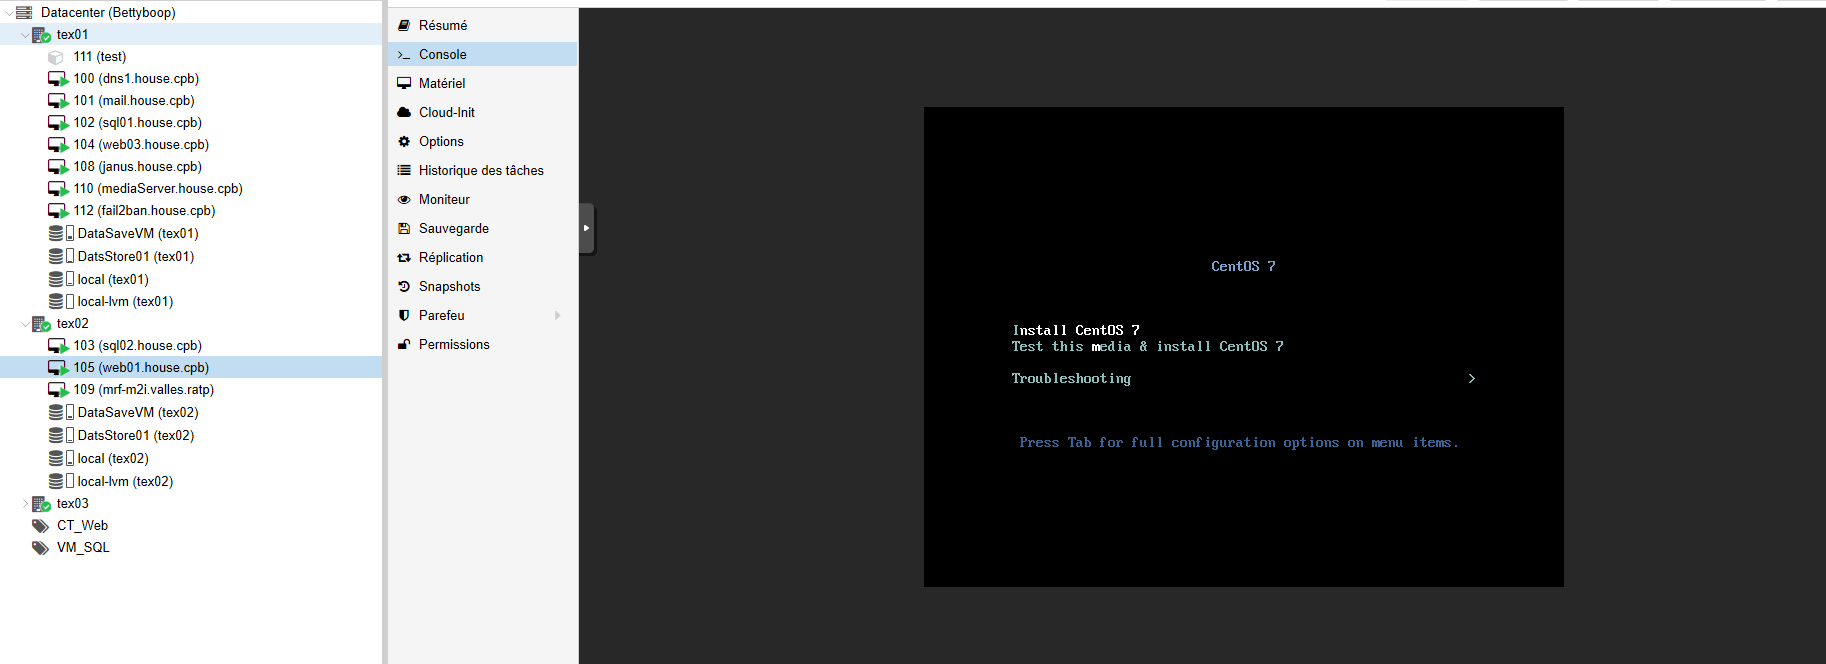
Pendant la phase d’installation activer les cartes réseaux (DHCP) provisoirement.
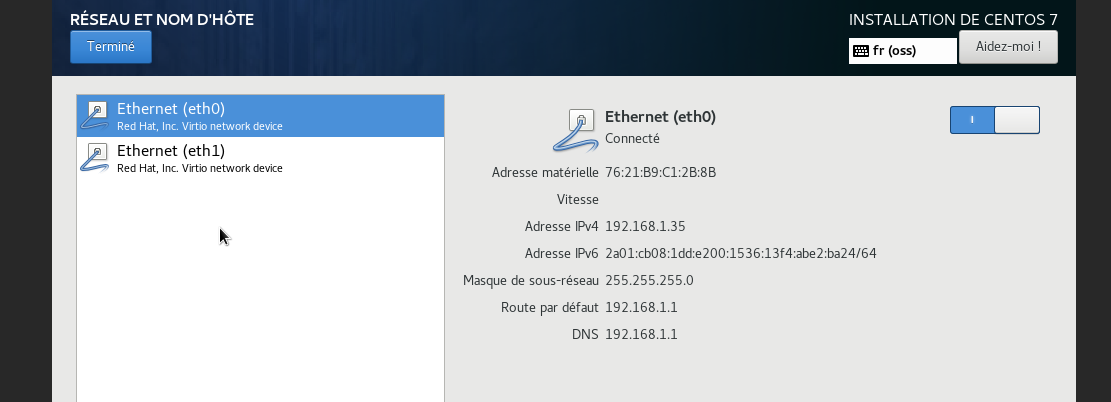
Configurer la machine
[root@pc-218 chris]# vi /etc/hostname

[root@pc-218 chris]# cd /etc/sysconfig/network-scripts/
[root@pc-218 network-scripts]#ls –al

[root@pc-218 network-scripts]# vi ifcfg-eth0
Commenter les lignes de l’IPV6.
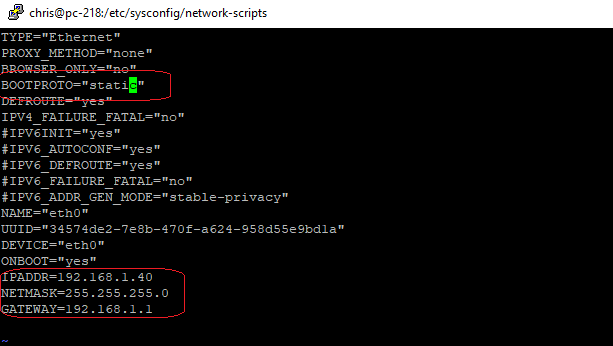
Désactiver l’ipv6
[root@pc-218 network-scripts]# vi /etc/sysctl.d/disableipv6.conf

Ajouter la commande : net.ipv6.conf.all.disable_ipv6 = 1

[root@pc-218 network-scripts]# vi ifcfg-eth0
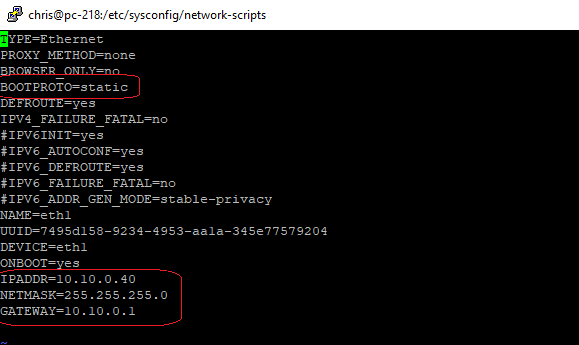
Ajouter le DNS1=192.168.1.1
Installer les paquets
[root@pc-218 network-scripts]#yum update
[root@pc-218 network-scripts]# yum install qemu-guest-agent nmap net-tools
Installer Apache
[root@web01 cp219538]# yum install httpd
[root@web01 cp219538]# systemctl enable httpd
[root@web01 cp219538]# systemctl start httpd
Installer les règles Firewall
[root@web01 cp219538]# firewall-cmd --zone=public --permanent --add-service=http
[root@web01 cp219538]# firewall-cmd --zone=public --permanent --add-service=https
[root@web01 cp219538# firewall-cmd --reload

Installer PHP
[root@web01 cp219538]# yum install php php-mcrypt php-cli php-gd php-curl php-mysql php-ldap php-zip php-fileinfo
[root@web01 cp219538]# php -v

Montage Ressource réseau cifs (Synology)
[root@web01 cp219538]# mkdir /home/www
[root@web01 cp219538]# yum install cifs-common cifs-utils
[root@web01 cp219538]# vi /root/.datastore1
username=User
password=Password_user

[root@web01 cp219538]# vi /etc/fstab
//10.10.0.52/DataStore01/www /home/www cifs credentials=/root/.datastore1,iocharset=utf8,vers=2.0,uid=48,gid=48 0 0

[root@web01 cp219538]# mount –a
[root@web01 cp219538]# df –h

Création des répertoires sites
[root@web01 cp219538]#mkdir /home/www/site1
[root@web01 cp219538]#mkdir /home/www/site2
[root@web01 cp219538]#mkdir /home/www/site3
3°) Création des pages Web pour les 3 sites
Configuration Site1
[root@web01 cp219538]# vi /home/www/site1/index.php

<center><h1><b> site1.en-images.info (site1) </b></h1></center>
<?php
// afficher le nom du fichier de script éxécuté
echo $_SERVER['PHP_SELF'];
echo "<br>";
// afficher l'adresse IP du serveur où le script est éxécuté
echo $_SERVER['SERVER_ADDR'];
echo "<br>";
// afficher le nom d'hôte du serveur
echo $_SERVER['SERVER_NAME'];
echo "<br>";
// afficher la méthode de requête ('GET', 'HEAD', 'POST', 'PUT')
echo $_SERVER['REQUEST_METHOD'];
echo "<br>";
// afficher les paramètres de l'URL
echo $_SERVER['QUERY_STRING'];
echo "<br>";
// afficher le nom du répertoire racine du script
echo $_SERVER['DOCUMENT_ROOT'];
echo "<br>";
// afficher le nom d'hôte de la machine cliente
echo $_SERVER['HTTP_HOST'];
echo "<br>";
// afficher les informations sur le navigateur utilisé
echo $_SERVER['HTTP_USER_AGENT'];
echo "<br>";
// afficher l'adresse IP du client
echo $_SERVER['REMOTE_ADDR'];
echo "<br>";
?>
Configuration Site2
[root@web01 cp219538]# cp /home/www/site1/index.php /home/www/site2/index.php
[root@web01 cp219538]# vi /home/www/site2/index.php
<center><h1><b> site2.en-images.info (site2) </b></h1></center>
<?php
// afficher le nom du fichier de script éxécuté
echo $_SERVER['PHP_SELF'];
echo "<br>";
// afficher l'adresse IP du serveur où le script est éxécuté
echo $_SERVER['SERVER_ADDR'];
echo "<br>";
// afficher le nom d'hôte du serveur
echo $_SERVER['SERVER_NAME'];
echo "<br>";
// afficher la méthode de requête ('GET', 'HEAD', 'POST', 'PUT')
echo $_SERVER['REQUEST_METHOD'];
echo "<br>";
// afficher les paramètres de l'URL
echo $_SERVER['QUERY_STRING'];
echo "<br>";
// afficher le nom du répertoire racine du script
echo $_SERVER['DOCUMENT_ROOT'];
echo "<br>";
// afficher le nom d'hôte de la machine cliente
echo $_SERVER['HTTP_HOST'];
echo "<br>";
// afficher les informations sur le navigateur utilisé
echo $_SERVER['HTTP_USER_AGENT'];
echo "<br>";
// afficher l'adresse IP du client
echo $_SERVER['REMOTE_ADDR'];
echo "<br>";
?>
Configuration Site3
[root@web01 cp219538]# cp /home/www/site1/index.php /home/www/site3/index.php
[root@web01 cp219538]#vi /home/www/site3/index.php
<center><h1><b> site3.en-images.info (site3) </b></h1></center>
<?php
// afficher le nom du fichier de script éxécuté
echo $_SERVER['PHP_SELF'];
echo "<br>";
// afficher l'adresse IP du serveur où le script est éxécuté
echo $_SERVER['SERVER_ADDR'];
echo "<br>";
// afficher le nom d'hôte du serveur
echo $_SERVER['SERVER_NAME'];
echo "<br>";
// afficher la méthode de requête ('GET', 'HEAD', 'POST', 'PUT')
echo $_SERVER['REQUEST_METHOD'];
echo "<br>";
// afficher les paramètres de l'URL
echo $_SERVER['QUERY_STRING'];
echo "<br>";
// afficher le nom du répertoire racine du script
echo $_SERVER['DOCUMENT_ROOT'];
echo "<br>";
// afficher le nom d'hôte de la machine cliente
echo $_SERVER['HTTP_HOST'];
echo "<br>";
// afficher les informations sur le navigateur utilisé
echo $_SERVER['HTTP_USER_AGENT'];
echo "<br>";
// afficher l'adresse IP du client
echo $_SERVER['REMOTE_ADDR'];
echo "<br>";
?>
3°) Configurer Apache pour les 3 sites
Configurer Apache
[root@web01 cp219538]# cd /etc/httpd/conf
[root@web01 cp219538]# vi httpd.conf
Modifier
ServerAdmin chris@en-images.info
ServerName web01.house.cpb:80
Commenter
#<Directory />
# AllowOverride none
# Require all denied
#</Directory>
Commenter
#DocumentRoot "/var/www/html"
Commenter
#<Directory "/var/www">
# AllowOverride None
# # Allow open access:
# Require all granted
#</Directory>
Commenter
#<IfModule dir_module>
# DirectoryIndex index.html
#</IfModule>
IncludeOptional conf.d/*.conf
[root@web01 cp219538]# cd /etc/httpd/conf.d
[root@web01 cp219538]# mv welcome.conf welcome.conf-d
[root@web01 cp219538]# mv userdir.conf userdir.conf-d
4°) Configurer les VirtualHost
Configure Site1
[root@web01 cp219538]# touch site1.conf
[root@web01 cp219538]# vi site1.conf
<VirtualHost *:80>
             ServerAdmin chris@en-images.info
             DocumentRoot /home/www/site1
             ServerName house.cpb
             ServerAlias site1.house.cpb
</VirtualHost>

<VirtualHost *:80>
             ServerAdmin chris@en-images.info
             DocumentRoot /home/www/site1
             ServerName en-images.info
             ServerAlias site1.en-images.info
</VirtualHost>
Configure Site2
[root@web01 cp219538]# touch site2.conf
[root@web01 cp219538]# vi site2.conf
<VirtualHost *:80>
              ServerAdmin chris@en-images.info
              DocumentRoot /home/www/site2/index.php
              ServerName house.cpb
              ServerAlias site2.house.cpb
</VirtualHost>

<VirtualHost *:80>
              ServerAdmin chris@en-images.info
              DocumentRoot /home/www/site2/index.php
              ServerName en-images.info
              ServerAlias site2.en-images.info
</VirtualHost>
Configure Site3
[root@web01 cp219538]# touch site3.conf
[root@web01 cp219538]# vi site3.conf
<VirtualHost *:80>
             ServerAdmin chris@en-images.info
             DocumentRoot /home/www/site3
             ServerName house.cpb
             ServerAlias site3.house.cpb
</VirtualHost>

<VirtualHost *:80>
             ServerAdmin chris@en-images.info
             DocumentRoot /home/www/site3
             ServerName en-images.info
             ServerAlias site3.en-images.info
</VirtualHost>
Redémarrer le serveur apache pour prendre en compte les modifications.
Désactiver Selinux
[root@web01 conf.d]# vi /etc/selinux/config
SELINUX=disabled
Ajout des Sites dans le fichier si pas de DNS.
[root@web01 conf.d]# vi /etc/hosts
10.10.0.40 site1.house.cpb site1.en-images.info site1
10.10.0.40 site2.house.cpb site2.en-images.info site2
10.10.0.40 site3.house.cpb site3.en-images.info site3
Test accès des sites via le Proxy Nginx


On voit bien que la machine répondant sur le réseau Privé est web01.house.cpb sur son IP 10.10.0.40
5°) Réalisation des 2 machines Web02 et web03 – Clone Web01
Pour réaliser les machines web02 et web03 il vous suffit de cloner la machine web01.
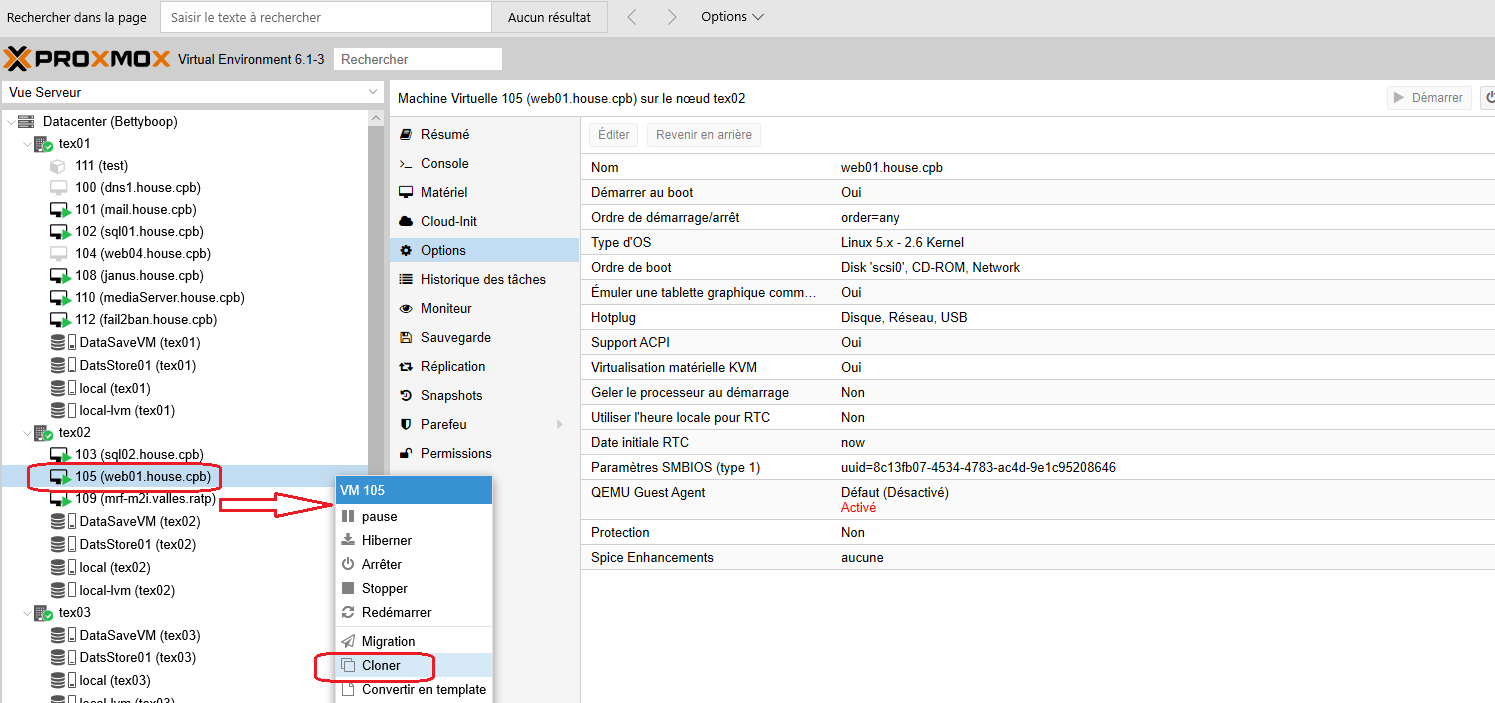
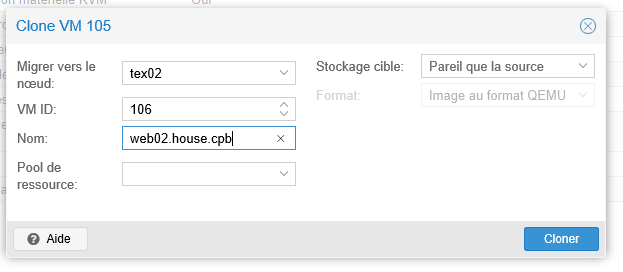
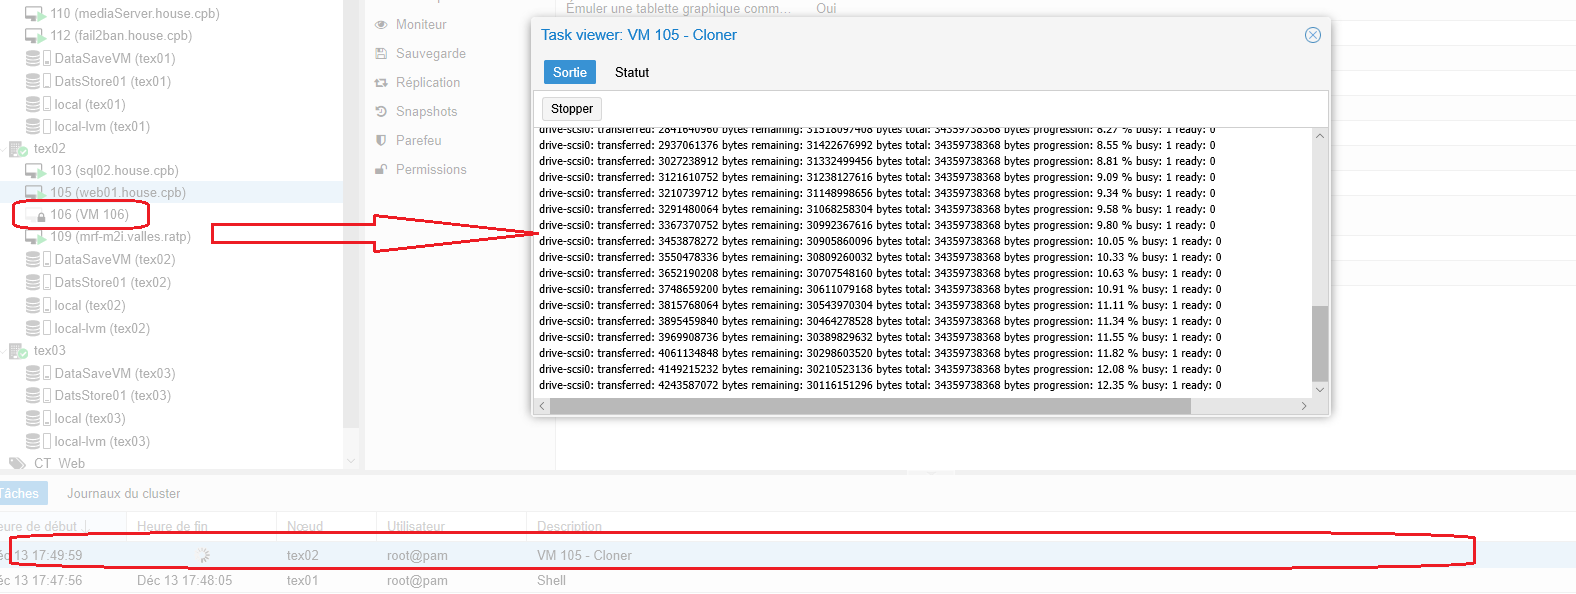
Refaire l’étape pour créer web03.house.cpb.
Les 3 machines sont désormais disponible sur le Cluster Proxmox.

6°) Reconfigurer l’host web02.house.cpb Clone de web01.house.cpb
Démarrer la machine clone de web02.house.cp
Modification nom d’host
[root@web01 chris]# vi /etc/hostname
Remplacer web01.house.cpb par web02.house.cpb

Modification adresse IP Lan et Privé
[root@web01 chris]# cd /etc/sysconfig/network-scripts
[root@web01 network-scripts]# vi ifcfg-eth0

TYPE="Ethernet"
PROXY_METHOD="none"
BROWSER_ONLY="no"
BOOTPROTO="static"
DEFROUTE="yes"
IPV4_FAILURE_FATAL="no"
#IPV6INIT="yes"
#IPV6_AUTOCONF="yes"
#IPV6_DEFROUTE="yes"
#IPV6_FAILURE_FATAL="no"
#PV6_ADDR_GEN_MODE="stable-privacy"
NAME="eth0"
UUID="e516570a-1f8b-4a20-8ec8-6ecd62f29174"
DEVICE="eth0"
ONBOOT="yes"
IPADDR=192.168.1.41
NETMASK=255.255.255.0
GATEWAY=192.168.1.1
DNS1=192.168.1.1
[root@web01 network-scripts]# vi ifcfg-eth1

TYPE=Ethernet
PROXY_METHOD=none
BROWSER_ONLY=no
BOOTPROTO=static
DEFROUTE=yes
IPV4_FAILURE_FATAL=no
#IPV6INIT=yes
#IPV6_AUTOCONF=yes
#IPV6_DEFROUTE=yes
#IPV6_FAILURE_FATAL=no
#IPV6_ADDR_GEN_MODE=stable-privacy
NAME=eth1
UUID=f07df38e-0cbd-46ad-8ff8-22f88ea20c98
DEVICE=eth1
ONBOOT=yes
IPADDR=10.10.0.41
NETMASK=255.255.255.0
GATEWAY=10.10.0.1
DNS1=192.168.1.1
Modification adresse host (si pas de DNS)
[root@web01 network-scripts]# cd /etc
[root@web01 network-scripts]# vi hosts
10.10.0.40 site1.house.cpb site1.en-images.info site1
10.10.0.41 site2.house.cpb site2.en-images.info site2
10.10.0.42 site3.house.cpb site3.en-images.info site3
7°) Reconfigurer l’host web03.house.cpb Clone de web01.house.cpb
Démarrer la machine clone de web03.house.cp
Modification nom d’host
[root@web01 chris]# vi /etc/hostname
Remplacer web02.house.cpb par web03.house.cpb

Modification adresse IP Lan et Privé
[root@web01 chris]# cd /etc/sysconfig/network-scripts
[root@web01 network-scripts]# vi ifcfg-eth0

TYPE="Ethernet"
PROXY_METHOD="none"
BROWSER_ONLY="no"
BOOTPROTO="static"
DEFROUTE="yes"
IPV4_FAILURE_FATAL="no"
#IPV6INIT="yes"
#IPV6_AUTOCONF="yes"
#IPV6_DEFROUTE="yes"
#IPV6_FAILURE_FATAL="no"
#IPV6_ADDR_GEN_MODE="stable-privacy"
NAME="eth0"
UUID="e516570a-1f8b-4a20-8ec8-6ecd62f29174"
DEVICE="eth0"
ONBOOT="yes"
IPADDR=192.168.1.42
NETMASK=255.255.255.0
GATEWAY=192.168.1.1
DNS1=192.168.1.1
[root@web01 network-scripts]# vi ifcfg-eth1

TYPE=Ethernet
PROXY_METHOD=none
BROWSER_ONLY=no
BOOTPROTO=static
DEFROUTE=yes
IPV4_FAILURE_FATAL=no
#IPV6INIT=yes
#IPV6_AUTOCONF=yes
#IPV6_DEFROUTE=yes
#IPV6_FAILURE_FATAL=no
#IPV6_ADDR_GEN_MODE=stable-privacy
NAME=eth1
UUID=f07df38e-0cbd-46ad-8ff8-22f88ea20c98
DEVICE=eth1
ONBOOT=yes
IPADDR=10.10.0.42
NETMASK=255.255.255.0
GATEWAY=10.10.0.1
DNS1=192.168.1.1
Modification adresse host (si pas de DNS)
[root@web01 network-scripts]# cd /etc
[root@web01 network-scripts]# vi hosts
10.10.0.40 site1.house.cpb site1.en-images.info site1
10.10.0.41 site2.house.cpb site2.en-images.info site2
10.10.0.42 site3.house.cpb site3.en-images.info site3
REBOOT la machine.
Petit Test


Organisation des fichiers de conf pour le LoadBalancing
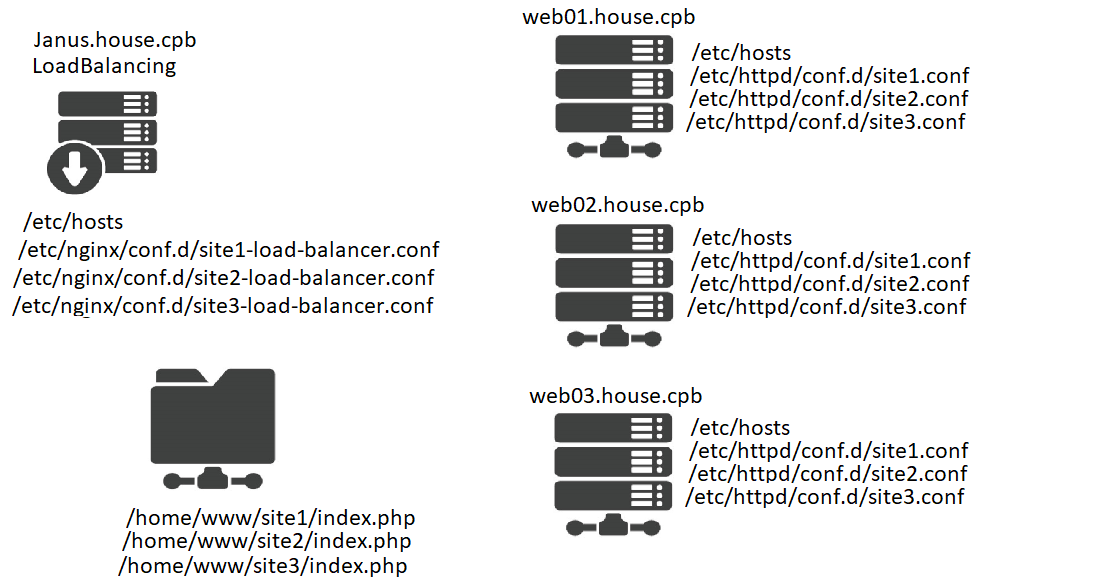
Au stade actuel, si une machine Host ne répond pas les 2 autres prendrons les requêtes. Néanmoins, une faille est assez gênante, si le Proxy Nginx tombait en panne on aurais plus d’accès aux sites Web. La solution serait de doubler le Proxy et de les mettre en HA.
8°) Ajout d’une nouvelle machine Nginx LoadBalancing
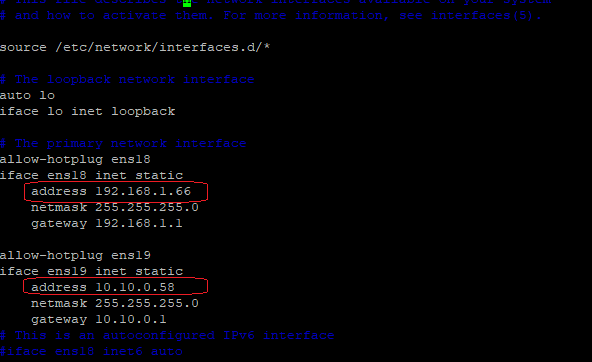
- Host : floki.house.cpb
- IP Lan : 192.168.1.66
- IP Privé : 10.10.1.58 (Vlan10)
Créer un clone de la machine janus.house.cpb et modifier les fichiers suivants
root@janus:/home/cp219538# vi /etc/hostname
![]()
root@januvs:/home/cp219538# vi /etc/network/interfaces
Rebooter la machine
A présent, il y a deux machine Loadbalancing Nginx avec la même configuration d’infrastructure.
8°) Ajout d’un contrôle check « hearthBeat » entre les deux LoadBalancing
Installer « HeartBeat » sur les deux machines
Machine Janus
root@janus:/home/cp219538#apt update && apt upgrade
root@janus:/home/cp219538# apt install heartbeat
Machine Floki
root@ floki:/home/cp219538#apt update && apt upgrade
root@floki:/home/cp219538# apt install heartbeat
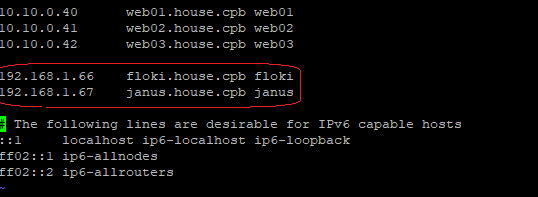
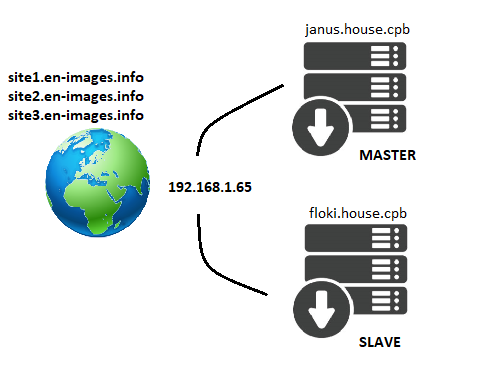
- Janus.house.cpb sera le Serveur « Master »
- floki.house.cpb sera le Serveur « slave »
Sur les deux machines.
root@janus:/home/cp219538# vi /etc/hosts
Partie MASTER (janus)
Master – copier les fichiers de conf
root@janus:/etc# cp /usr/share/doc/heartbeat/authkeys /etc/ha.d/
root@janus:/etc# touch /etc/ha.d/ha.cf
root@janus:/etc# touch /etc/ha.d/ haresources
Master – configuration des Keys entre les deux Serveur LoadBalancing
root@janus:/etc/ha.d# vi authkeys
auth 1
1 sha1 ClusterLoadBalancing-ha
root@janus:/etc/ha.d# chmod 600 /etc/ha.d/authkeys
Master – configuration du Nœud HA
root@janus:/etc/ha.d# vi /etc/ha.d/ha.cf
logfile /var/log/ha-log
logfacility daemon
keepalive 1
deadtime 10
#initdead 120
bcast ens18
#udpport 694
ping 192.168.1.1
auto_failback yes
node janus.house.cpb
node floki.house.cpb
Master – configuration de l’IP virtuelle
root@janus:/etc/ha.d# vi /etc/ha.d/haresources
janus.house.cpb 192.168.1.65 nginx
Reproduire la configuration authkeys,ha.cf et haresources sur le serveur « slave »
Partie SLAVE (floki)
Slave – configuration des Keys entre les deux Serveur LoadBalancing
root@floki:/etc/ha.d# vi authkeys
auth 1
1 sha1 ClusterLoadBalancing-ha
root@floki:/etc/ha.d# chmod 600 /etc/ha.d/authkeys
Slave – configuration du Nœud HA
root@floki:/etc/ha.d# vi /etc/ha.d/ha.cf
logfile /var/log/ha-log
logfacility daemon
keepalive 1
deadtime 10
#initdead 120
bcast ens18
#udpport 694
ping 192.168.1.1
auto_failback yes
node janus.house.cpb
node floki.house.cpb
Slave – configuration de l’IP virtuelle
root@floki:/etc/ha.d# vi /etc/ha.d/haresources
floki.house.cpb 192.168.1.65 nginx
Démarrer le serveur Primaire Janus
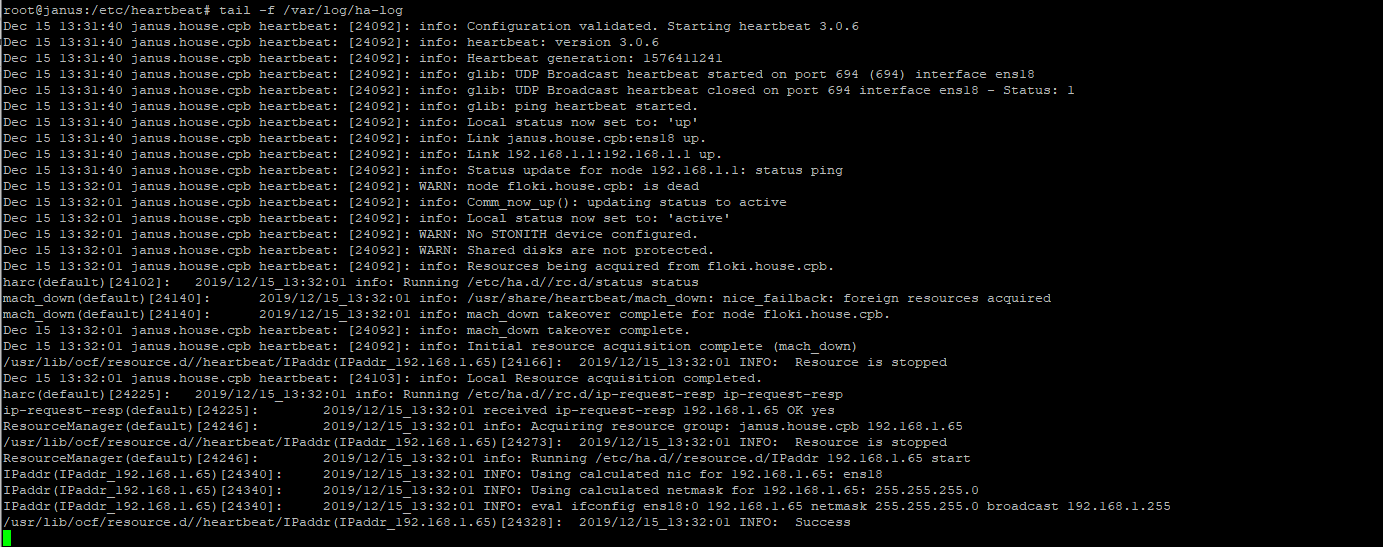
root@janus:/etc/heartbeat# service heartbeat start
root@janus:/etc/heartbeat# tail -f /var/log/ha-log
IP Virtuelle
root@janus:/etc/heartbeat# ifconfig ens18:0
ens18:0: flags=4163<UP,BROADCAST,RUNNING,MULTICAST> mtu 1500
inet 192.168.1.65 netmask 255.255.255.0 broadcast 192.168.1.255
ether 8a:ff:ab:aa:38:1a txqueuelen 1000 (Ethernet)
Démarrer le serveur Slave floki
root@floki:/etc/heartbeat# service heartbeat start
L’IP Virtuelle va désormais être l’IP d’accès au « LoadBalaning » Janus et Floki.
9°) Test « HeartBeat » et LoadBalancing
Test Maître UP et Slave UP
Test sur site1.en-images.info

Test Maître DOWN et Slave UP
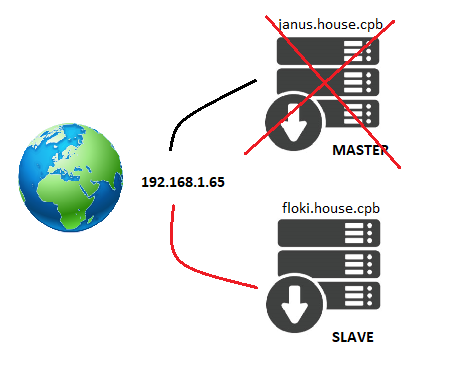
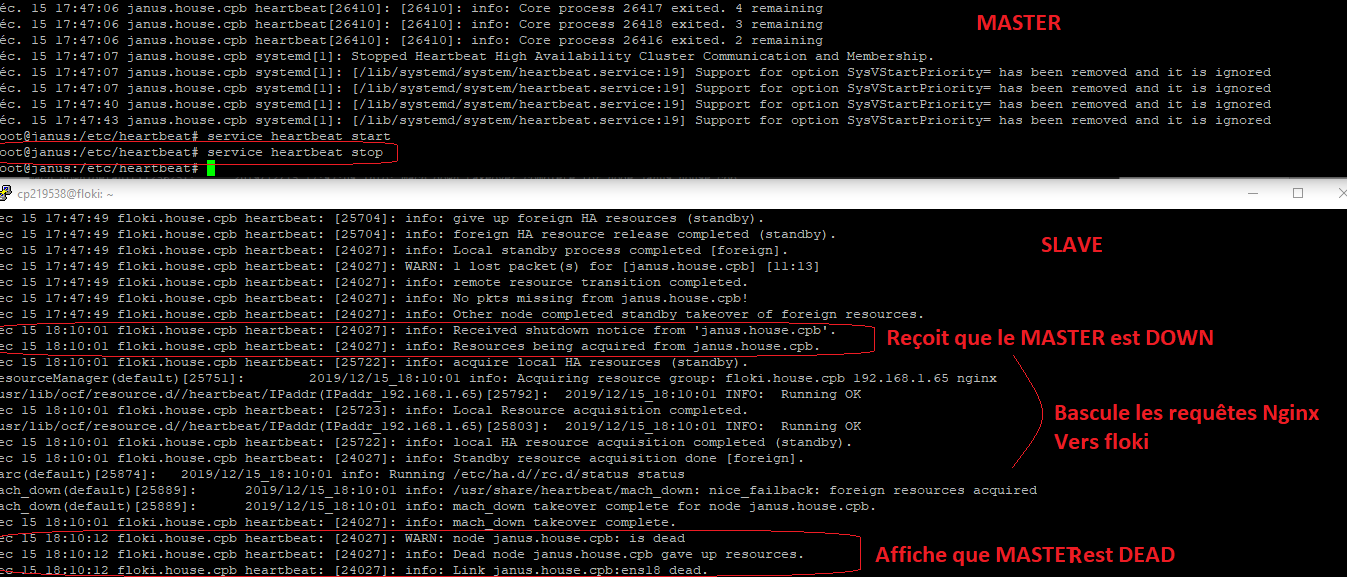
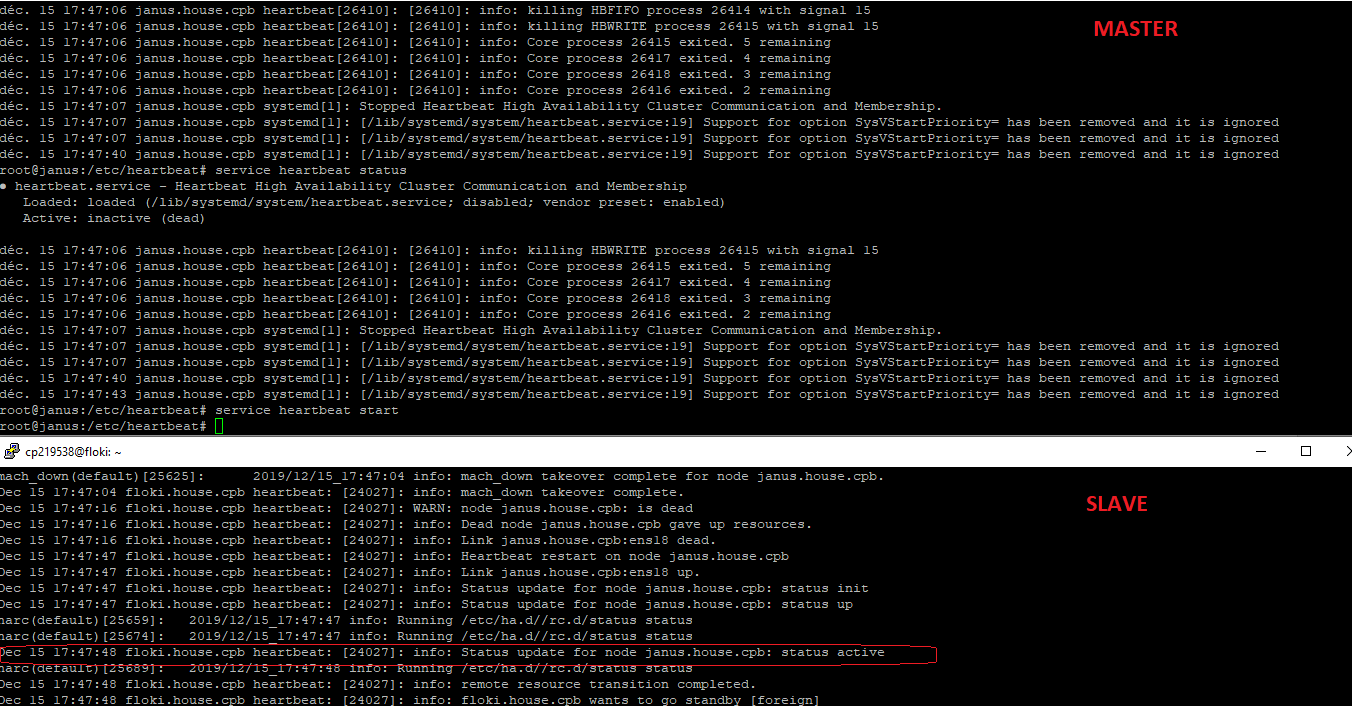
Stoppons le serveur « janus.house.cpb » et vérifions que « floki.house.cpb » prend la relève.
Test sur site1.en-images.info

Views: 4064


I was suggested this blog by my cousin. I’m not
sure whether this post is written by him as nobody else know such detailed about my problem.
You are wonderful! Thanks!
You really make it appear really easy together with
your presentation however I to find this topic to be really one thing which I
think I’d by no means understand. It kind of feels too complicated and very vast
for me. I am having a look forward on your next post,
I’ll try to get the hang of it!
Thank you for sharing your info. I really appreciate your
efforts and I will be waiting for your next write ups thank you once again.
If you wish for to obtain a great deal from this piece of writing then you have
to apply these techniques to your won web site.
Hi my friend! I wish to say that this post is amazing, nice written and include almost all significant
infos. I’d like to peer extra posts like this .
I know this web site offers quality depending articles or reviews and other information, is
there any other website which gives such data in quality?
This text is invaluable. Where can I find out more?
Wonderful blog you have here but I was wondering
if you knew of any user discussion forums that cover the same topics talked about in this article?
I’d really love to be a part of group where I can get feedback from other experienced people that share the
same interest. If you have any suggestions, please let me know.
Kudos!
I have read so many articles about the blogger lovers however this
post is actually a pleasant paragraph, keep it up.
I think this is one of the most important info for me. And i’m glad reading your
article. But want to remark on some general things, The website style is
ideal, the articles is really nice : D. Good
job, cheers
It’s hard to find educated people on this topic, however, you sound like
you know what you’re talking about! Thanks
I wanted to thank you for this wonderful read!! I absolutely loved every
little bit of it. I’ve got you book-marked to check out new stuff you post…
Post writing is also a excitement, if you be acquainted with then you can write or else it
is complicated to write.
whoah this weblog is great i really like studying your articles.
Stay up the good work! You know, many individuals are looking around for this info, you
can aid them greatly.
What a stuff of un-ambiguity and preserveness of valuable know-how concerning unexpected feelings.
Excellent blog here! Also your web site loads up fast!
What web host are you using? Can I get your affiliate link to your host?
I wish my website loaded up as fast as yours lol
Hello! I’ve been following your weblog for a long time now
and finally got the bravery to go ahead and give you a shout out from Porter Tx!
Just wanted to tell you keep up the great job!
What’s up every one, here every person is sharing these kinds of
experience, thus it’s pleasant to read this weblog, and
I used to visit this website all the time.