1°) Installation DEBIAN 9
Partie Machine et Système
Nom de la machine

Nom du Domaine Local

Installer une version minimale de Linux afin de déployer une machine avec uniquement nos besoins.
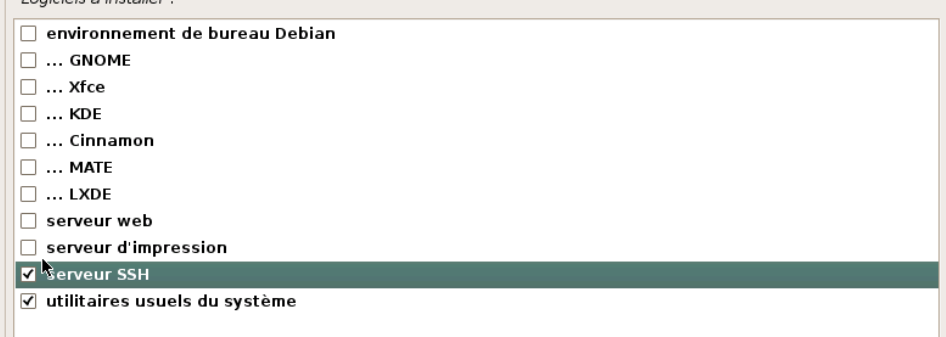
Installation de base terminée

Partie Réseau
Nous allons fixer une IP statique sur notre serveur, l’IP sera 192.168.1.10/24
root@mailx:/home/cp219538# vi /etc/network/interfaces

################
# IP FIXE MAILX
################
allow-hotplug ens18
iface ens18 inet static
address 192.168.1.10
netmask 255.255.255.0
gateway 192.168.1.1
dns-nameservers 192.168.1.1
root@mailx:/home/cp219538# systemctl restart networking.service

Désactivons l’IPv6
root@mailx:/home/cp219538# vi /etc/sysctl.conf

##################
# IPV6 à OFF
#################
# désactivation de ipv6 pour toutes les interfaces
net.ipv6.conf.all.disable_ipv6 = 1
# désactivation de l’auto configuration pour toutes les interfaces
net.ipv6.conf.all.autoconf = 0
# désactivation de ipv6 pour les nouvelles interfaces (ex:si ajout de carte réseau)
net.ipv6.conf.default.disable_ipv6 = 1
# désactivation de l’auto configuration pour les nouvelles interfaces
net.ipv6.conf.default.autoconf = 0
root@mailx:/home/cp219538# sysctl –p

net.ipv6.conf.all.disable_ipv6 = 1
net.ipv6.conf.all.autoconf = 0
net.ipv6.conf.default.disable_ipv6 = 1
net.ipv6.conf.default.autoconf = 0

L’IPv6 est désormais désactivé.
Mettre à jour la liste des /etc/hosts
root@mailx:/home/cp219538# vi /etc/hosts

127.0.0.1 localhost
#127.0.1.1 mailx.house.cpb mailx
192.168.1.10 mailx.house.cpb mailx
Installation MySQL 8.0
root@mailx:/home/cp219538# apt-get update && apt-get dist-upgrade
root@mailx:/home/cp219538# wget http://repo.mysql.com/mysql-apt-config_0.8.13-1_all.deb
root@mailx:/home/cp219538# dpkg -i mysql-apt-config_0.8.13-1_all.deb

« OK »
root@mailx:/home/cp219538# apt update && apt upgrade

root@mailx:/home/cp219538# apt install mysql-server

« Mot de passe Root pour Mysql »

« Use Legacy Auth…. »
root@mailx:/home/cp219538# systemctl enable mysql
root@mailx:/home/cp219538# systemctl start mysql
3°) Installation POSTFIX et Dépendances
Installation Postfix
root@mailx:/home/cp219538# apt-get install postfix postfix-mysql procmail

« Site Internet »

« Nom de la machine Serveur Mail Local »
Création de l’utilisateur/Base Postfix pour PostfixAdmin
root@mailx:/home/cp219538# mysql -u root -p
Enter password:
Welcome to the MySQL monitor. Commands end with ; or \g.
Your MySQL connection id is 8
Server version: 8.0.22 MySQL Community Server – GPL
Copyright (c) 2000, 2020, Oracle and/or its affiliates. All rights reserved.
Oracle is a registered trademark of Oracle Corporation and/or its
affiliates. Other names may be trademarks of their respective
owners.
Type ‘help;’ or ‘\h’ for help. Type ‘\c’ to clear the current input statement.
mysql> CREATE database postfix;
Query OK, 1 row affected (0.01 sec)
mysql> CREATE USER ‘postfix’@’localhost’ IDENTIFIED BY ‘VOTRE_MOT_PASSE_POSTFIX’;
Query OK, 0 rows affected (0.01 sec)
mysql> GRANT USAGE ON *.* TO ‘postfix’@’localhost’;
Query OK, 0 rows affected (0.00 sec)
mysql> GRANT ALL PRIVILEGES ON postfix.* TO ‘postfix’@’localhost’;
Query OK, 0 rows affected (0.00 sec)
mysql> exit
Bye
Spécifications PostFix dans Mysql
root@mailx:/home/cp219538# vi /etc/mysql/my.cnf

[client]
default-character-set=utf8
[mysql]
default-character-set=utf8
[mysqld]
collation-server = utf8_unicode_ci
character-set-server = utf8
default_authentication_plugin = mysql_native_password
root@mailx:/home/cp219538# systemctl restart mysql
root@mailx:/home/cp219538# iptables -A INPUT -p tcp --dport 3306 -j ACCEPT

4°) Installation NGINX
root@mailx:/home/cp219538# apt install nginx curl
Test fonctionnement de NGINX.
root@mailx:/home/cp219538# curl -I 127.0.0.1
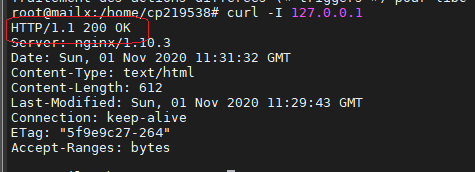
Ajout des port http et https dans le firewall
root@mailx:/home/cp219538# iptables -A INPUT -p tcp --dport 80 -j ACCEPT
root@mailx:/home/cp219538# iptables -A INPUT -p tcp --dport 443 -j ACCEPT

root@mailx:/home/cp219538# systemctl restart nginx && systemctl enable nginx
Synchronizing state of nginx.service with SysV service script with /lib/systemd/systemd-sysv-install.
Executing: /lib/systemd/systemd-sysv-install enable nginx
5°) Installation POSTFIX Admin 3.2
Installation
root@mailx:/home/cp219538# cd /var/www
root@mailx:/var/www# wget http://downloads.sourceforge.net/project/postfixadmin/postfixadmin/postfixadmin-3.2/postfixadmin-3.2.tar.gz
root@mailx:/var/www# tar -xzf postfixadmin-3.2.tar.gz
root@mailx:/var/www# mv postfixadmin-3.2 postfixadmin
root@mailx:/var/www# rm -rf postfixadmin-3.2.tar.gz
root@mailx:/var/www# chown -R www-data:www-data postfixadmin
6°) Installation PHP 5.6
root@mailx:/var/www# apt install ca-certificates apt-transport-https lsb-release
root@mailx:/var/www# wget -q https://packages.sury.org/php/apt.gpg -O- | apt-key add -
root@mailx:/var/www# echo "deb https://packages.sury.org/php/ $(lsb_release -sc) main" | tee /etc/apt/sources.list.d/php.list
root@mailx:/var/www# apt update && apt upgrade
root@mailx:/var/www# apt install php5.6
root@mailx:/var/www# apt install php5.6-cli php5.6-common php5.6-curl php5.6-mbstring php5.6-mysql php5.6-xml php5.6-imap php5.6-fpm
Démarrage des services PHP5 et NGINX
root@mailx:/var/www# service php5.6-fpm start
root@mailx:/var/www# systemctl enable php5.6-fpm
Synchronizing state of php5.6-fpm.service with SysV service script with /lib/systemd/systemd-sysv-install.
Executing: /lib/systemd/systemd-sysv-install enable php5.6-fpm
root@mailx:/var/www# service nginx restart
7° Configuration POSTFIX Admin 3.2
Configuration du site php POSTFIX Admin
root@mailx:/var/www# cp /var/www/postfixadmin/config.inc.php{,.ori}
root@mailx:/var/www# vi /var/www/postfixadmin/config.inc.php

$CONF['configured'] = true;
$CONF['default_language'] = 'fr';
$CONF['database_type'] = 'mysqli';
$CONF['database_host'] = 'localhost';
$CONF['database_user'] = 'postfix';
$CONF['database_password'] = 'Votre_MOT_DE_PASSE_MYSQLserver';
$CONF['database_name'] = 'postfix';
$CONF['database_prefix'] = 'postfix_';
$CONF['admin_email'] = 'chris@en-images.info';
$CONF['domain_path'] = 'YES';
$CONF['domain_in_mailbox'] = 'NO';
$CONF['fetchmail'] = 'NO';
root@mailx:/var/www# cp /var/www/postfixadmin/config.inc.php /var/www/postfixadmin/config.local.php
root@mailx:/var/www# chown www-data:www-data /var/www/postfixadmin/config.local.php
root@mailx:/var/www/postfixadmin# mkdir /var/www/postfixadmin/templates_c
root@mailx:/var/www/postfixadmin# chown -R www-data:www-data /var/www/postfixadmin/templates_c
Configuration du site Postfix Admin sur NGINX
root@mailx:/var/www# vi /etc/nginx/sites-enabled/postfixadmin.conf

server {
 listen 80;
 server_name mailx.house.cpb;
 root /var/www/postfixadmin;
 index index.php;
 charset utf-8;
 location / {
 try_files $uri $uri/ index.php;
 }
 location ~* \.php$ {
 include /etc/nginx/fastcgi_params;
 fastcgi_pass unix:/var/run/php/php5.6-fpm.sock;
 fastcgi_index index.php;
 fastcgi_param SCRIPT_FILENAME $document_root$fastcgi_script_name;
 }
}
root@mailx:/var/www# service nginx restart
Pour le test, on ajoute sur la machine Windows du DEV, une entrée host dans le fichier « C:\Windows\System32\drivers\etc\hosts »
192.168.1.10 mailx.house.cpb
8°) Configuration Web Postfix Admin
L’accès de la partie de configuration se fait via l’adresse URL => http://mailx.house.cpb/public/setup.php
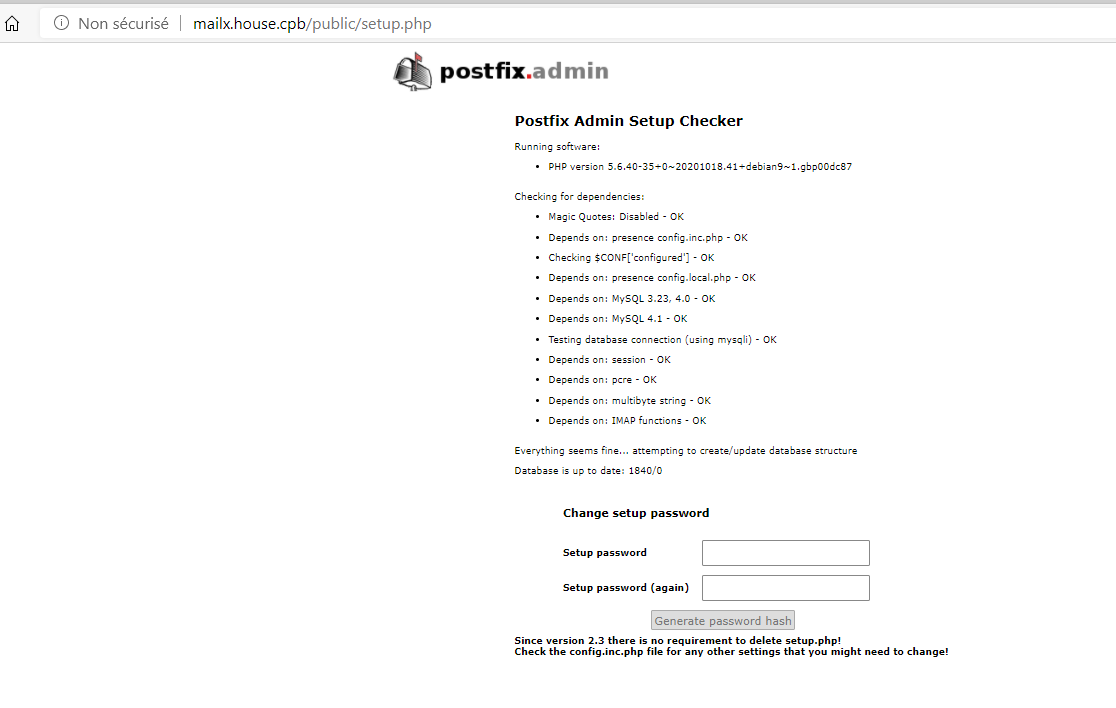
Générer un Password HASH pour l’administrateur de POSTFIX Admin
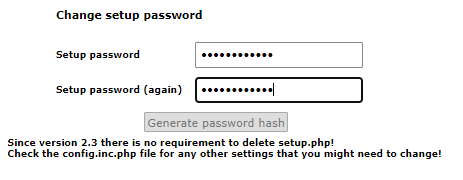
Ajouter le HASH code sur la variable « Setup_password » du fichier config.local.php


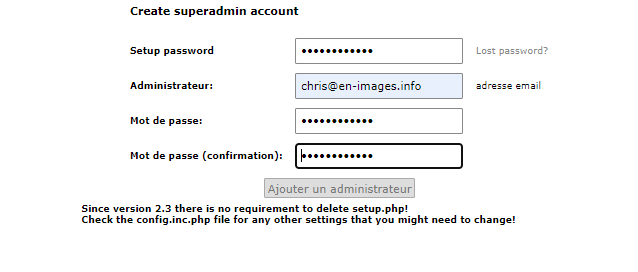
Création Compte « SuperAdmin » pour la gestion des Users/Domain du Site

9°) Configurer Serveur de Mail Local via Postfix Admin

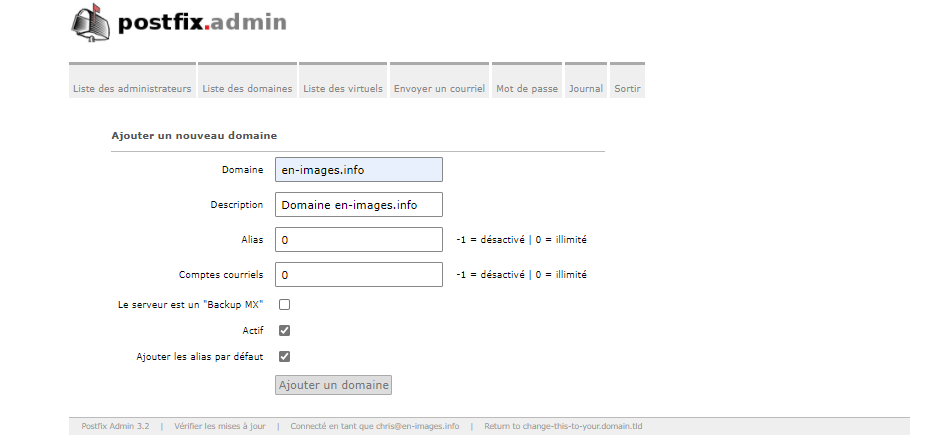
Ajouter un domaine sur le serveur de mail

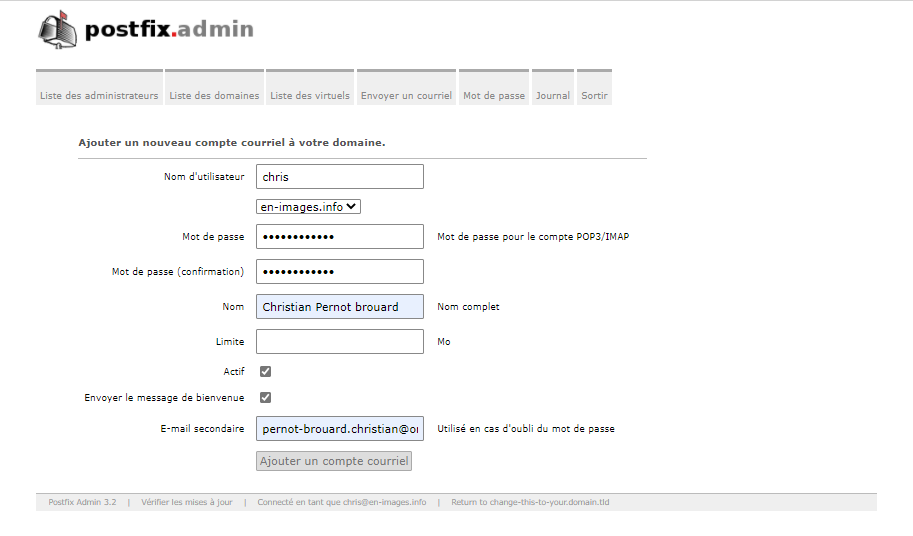
Ajouter Utilisateur sur le serveur de mail

Modifier les Alias par défaut du Postfix Admin


Modier les « change-this.. » par « en-images.info »

10°) Génération des Certificats (KEY CA , KEY Serveur , DH)
Génération du certificat KEY CA (Certificate Authority)
root@mailx:/var/www/postfixadmin# cd /home
root@mailx:/home# openssl genrsa -out ca.key.pem 4096
root@mailx:/home# openssl req -x509 -new -nodes -days 1460 -sha256 -key ca.key.pem -out ca.cert.pem

You are about to be asked to enter information that will be incorporated
into your certificate request.
What you are about to enter is what is called a Distinguished Name or a DN.
There are quite a few fields but you can leave some blank
For some fields there will be a default value,
If you enter '.', the field will be left blank.
-----
Country Name (2 letter code) [AU]:FR
State or Province Name (full name) [Some-State]:France
Locality Name (eg, city) []:Fontenay
Organization Name (eg, company) [Internet Widgits Pty Ltd]:Corp Ltd
Organizational Unit Name (eg, section) []:Certificate Authority
Common Name (e.g. server FQDN or YOUR name) []:Root CA
Email Address []:
Génération du certificat KEY Serveur
root@mailx:/home# openssl genrsa -out mailserver.key 4096
root@mailx:/home# openssl req -new -sha256 -key mailserver.key -out mailserver.csr

You are about to be asked to enter information that will be incorporated
into your certificate request.
What you are about to enter is what is called a Distinguished Name or a DN.
There are quite a few fields but you can leave some blank
For some fields there will be a default value,
If you enter '.', the field will be left blank.
-----
Country Name (2 letter code) [AU]:FR
Locality Name (eg, city) []:Fontenay
Organization Name (eg, company) [Internet Widgits Pty Ltd]:Corp Ltd
Organizational Unit Name (eg, section) []:en-images.info
Common Name (e.g. server FQDN or YOUR name) []:en-images.info
Email Address []:chris@en-images.info
Please enter the following 'extra' attributes
to be sent with your certificate request
A challenge password []:MOT_DE_PASSE_SOUHAITE
An optional company name []:-
Auto Certification des Certificats générés
root@mailx:/home# openssl x509 -req -days 1460 -sha256 -in mailserver.csr -CA ca.cert.pem -CAkey ca.key.pem -CAcreateserial -out mailserver.crt
Signature ok
subject=C = FR, ST = France, L = Fontenay, O = Corp Ltd, OU = en-images.info, CN = en-images.info, emailAddress = chris@en-images.info
Getting CA Private Key
Mise en place des Certificats
root@mailx:/home# chmod 444 ca.cert.pem
root@mailx:/home# chmod 444 mailserver.crt
root@mailx:/home# chmod 400 ca.key.pem
root@mailx:/home# chmod 400 mailserver.key
root@mail001:/home# mv ca.key.pem /etc/ssl/private/
root@mail001:/home# mv ca.cert.pem /etc/ssl/certs/
root@mail001:/home# mv mailserver.key /etc/ssl/private/
root@mail001:/home# mv mailserver.crt /etc/ssl/certs/
Génération du certificat DIFFIE-HELLMAN (DH)
root@mailx:/home# openssl dhparam -out /etc/postfix/dh2048.pem 2048
root@mailx:/home# openssl dhparam -out /etc/postfix/dh512.pem 512
11°) Configuration POSTFIX + SSL
root@mailx:/home# cp /etc/postfix/main.cf{,.ori}
root@mailx:/home# vi /etc/postfix/main.cf
Partie SMTP
######################
## RESTRICTIONS SMTP##
######################
smtpd_recipient_restrictions =
 permit_mynetworks,
 permit_sasl_authenticated,
 reject_non_fqdn_recipient,
 reject_unauth_destination,
 reject_unknown_recipient_domain,
 reject_rbl_client zen.spamhaus.org

smtpd_helo_restrictions =
 permit_mynetworks,
 permit_sasl_authenticated,
 reject_invalid_helo_hostname,
 reject_non_fqdn_helo_hostname
 # reject_unknown_helo_hostname

smtpd_client_restrictions =
 permit_mynetworks,
 permit_inet_interfaces,
 permit_sasl_authenticated
 # reject_plaintext_session,
 # reject_unauth_pipelining

smtpd_sender_restrictions =
 reject_non_fqdn_sender,
 reject_unknown_sender_domain
Partie TLS
####################
## TLS PARAMETERS ##
####################
# Smtp ( OUTGOING / Client )
smtp_tls_loglevel = 1
smtp_tls_security_level = may
smtp_tls_CAfile = /etc/ssl/certs/ca.cert.pem
smtp_tls_protocols = !SSLv3
smtp_tls_mandatory_protocols = !SSLv3
smtp_tls_mandatory_ciphers = high
smtp_tls_exclude_ciphers = aNULL, eNULL, EXPORT, DES, 3DES, RC2, RC4, MD5, PSK, SRP, DSS, AECDH, ADH
smtp_tls_note_starttls_offer = yes

# -----------------------------------------------------------------------------------------

# Smtpd ( INCOMING / Server )
smtpd_tls_loglevel = 1
smtpd_tls_auth_only = yes
smtpd_tls_security_level = may
smtpd_tls_received_header = yes
smtpd_tls_protocols = !SSLv3
smtpd_tls_mandatory_protocols = !SSLv3
smtpd_tls_mandatory_ciphers = medium

# Infos (voir : postconf -d)
# Medium cipherlist = aNULL:-aNULL:ALL:!EXPORT:!LOW:+RC4:@STRENGTH
# High cipherlist = aNULL:-aNULL:ALL:!EXPORT:!LOW:!MEDIUM:+RC4:@STRENGTH
# smtpd_tls_exclude_ciphers = NE PAS modifier cette directive pour des raisons de compatibilité
# avec les autres serveurs de mail afin d'éviter une erreur du type
# "no shared cipher" ou "no cipher overlap" puis un fallback en
# plain/text...
# smtpd_tls_cipherlist = Ne pas modifier non plus !

smtpd_tls_CAfile = $smtp_tls_CAfile
smtpd_tls_cert_file = /etc/ssl/certs/mailserver.crt
smtpd_tls_key_file = /etc/ssl/private/mailserver.key
smtpd_tls_dh1024_param_file = $config_directory/dh2048.pem
smtpd_tls_dh512_param_file = $config_directory/dh512.pem

tls_preempt_cipherlist = yes
tls_random_source = dev:/dev/urandom

smtp_tls_session_cache_database = btree:${data_directory}/smtp_scache
smtpd_tls_session_cache_database = btree:${data_directory}/smtpd_scache
lmtp_tls_session_cache_database = btree:${data_directory}/lmtp_scache
Partie SSL pour DOVECOT
#############################
## SASL PARAMETERS DOVECOT ##
#############################
smtpd_sasl_auth_enable = yes
smtpd_sasl_type = dovecot
smtpd_sasl_path = private/auth
smtpd_sasl_security_options = noanonymous
smtpd_sasl_tls_security_options = $smtpd_sasl_security_options
smtpd_sasl_local_domain = $mydomain
smtpd_sasl_authenticated_header = yes
broken_sasl_auth_clients = yes
Partie Virtual MAPS
##############################
## VIRTUALS MAPS PARAMETERS ##
##############################
virtual_uid_maps = static:5000
virtual_gid_maps = static:5000
virtual_minimum_uid = 5000
virtual_mailbox_base = /var/mail
virtual_transport = lmtp:unix:private/dovecot-lmtp
virtual_mailbox_domains = mysql:/etc/postfix/mysql-virtual-mailbox-domains.cf
virtual_mailbox_maps = mysql:/etc/postfix/mysql-virtual-mailbox-maps.cf
virtual_alias_maps = mysql:/etc/postfix/mysql-virtual-alias-maps.cf
Partie Configuration Mail Serveur Local
#######################
## GENERALS SETTINGS ##
#######################
smtpd_banner = $myhostname ESMTP $mail_name (Debian/GNU)
biff = no
append_dot_mydomain = no
readme_directory = no
delay_warning_time = 4h
mailbox_command = procmail -a "$EXTENSION"
recipient_delimiter = +
disable_vrfy_command = yes
message_size_limit = 502400000
mailbox_size_limit = 1024000000
inet_interfaces = all
inet_protocols = ipv4
myhostname = mail.en-images.info
myorigin = $mydomain
mydomain = en-images.info
mydestination = localhost localhost.$mydomain
#mynetworks = 127.0.0.0/8 [::ffff:127.0.0.0]/104 [::1]/128
mynetworks = 192.168.1.10,127.0.0.0/8 [::ffff:127.0.0.0]/104 [::1]/128
#mydestination = $mydomain, $myhostname, localhost.$mydomain, mail.$mydomain
relayhost = [smtp.orange.fr]
compatibility_level = 2
alias_maps = hash:/etc/aliases
alias_database = hash:/etc/aliases
12°) Configuration POSTFIX => Mysql

root@mailx:/etc/postfix# vi /etc/postfix/mysql-virtual-mailbox-domains.cf

hosts = 127.0.0.1
user = postfix
password = VOTRE_MOT_PASSE_POSTFIX
dbname = postfix
query = SELECT domain FROM postfix_domain WHERE domain='%s' and backupmx = 0 and active = 1
root@mailx:/etc/postfix# vi /etc/postfix/mysql-virtual-mailbox-maps.cf

hosts = 127.0.0.1
user = postfix
password = VOTRE_MOT_PASSE_POSTFIX
dbname = postfix
query = SELECT maildir FROM postfix_mailbox WHERE username='%s' AND active = 1
root@mail001:/var/www/postfixadmin# vi /etc/postfix/mysql-virtual-alias-maps.cf

hosts = 127.0.0.1
user = postfix
password = VOTRE_MOT_PASSE_POSTFIX
dbname = postfix
query = SELECT goto FROM postfix_alias WHERE address='%s' AND active = 1
root@mailx:/etc/postfix# vi /etc/postfix/mysql-sender-login-maps.cf

hosts = 127.0.0.1
user = postfix
password = VOTRE_MOT_PASSE_POSTFIX
dbname = postfix
query = SELECT username FROM postfix_mailbox WHERE username='%s' AND active = 1
13°) Activer SMTPs Port 587
root@mailx:/etc/postfix# vi /etc/postfix/master.cf

smtp inet n - y - - smtpd
et
submission inet n - y - - smtpd
 -o syslog_name=postfix/submission
 -o smtpd_tls_dh1024_param_file=${config_directory}/dh2048.pem
 -o smtpd_tls_security_level=encrypt
 -o smtpd_sasl_ _enable=yes
 -o smtpd_client_restrictions=permit_sasl_authenticated,reject
14°) Installation/Configuration DOVECOT
root@mailx:/etc/postfix# apt-get install dovecot-core dovecot-imapd dovecot-lmtpd dovecot-mysql
Activer les services DOVECOT
root@mail001:/var/www/postfixadmin# cp /etc/dovecot/dovecot.conf{,.ori}
root@mailx:/etc/postfix# vi /etc/dovecot/dovecot.conf

!include_try /usr/share/dovecot/protocols.d/*.protocol
protocols = imap lmtp
listen = *
!include conf.d/*.conf
Configurer DOVECOT mail
root@mailx:/etc/postfix# cp /etc/dovecot/conf.d/10-mail.conf{,.ori}
root@mailx:/etc/postfix# vi /etc/dovecot/conf.d/10-mail.conf

# Le contenur local est organisé de cette manière :
# /var/mail/vhosts/domain.tld/utilisateur
mail_location = maildir://var/mail/vhosts/%d/%n/mail
maildir_stat_dirs=yes

namespace inbox {
 inbox = yes
}

mail_uid = 5000
mail_gid = 5000

first_valid_uid = 5000
last_valid_uid = 5000
mail_privileged_group = vmail
Création des Répertoires Users Vmail
root@mailx:/etc/postfix# mkdir -p /var/mail/vhosts/en-images.info
root@mailx:/etc/postfix# groupadd -g 5000 vmail
root@mailx:/etc/postfix# useradd -g vmail -u 5000 vmail -d /var/mail
root@mailx:/etc/postfix# chown -R vmail:vmail /var/mail
Configurer DOVECOT Auth
root@mailx:/etc/postfix# cp /etc/dovecot/conf.d/10-auth.conf{,.ori}
root@mailx:/etc/postfix# vi /etc/dovecot/conf.d/10-auth.conf

disable_plaintext_auth = yes
auth_mechanisms = plain login
#!include auth-system.conf.ext # Commenter cette ligne
!include auth-sql.conf.ext # décommenter cette ligne
Configurer DOVECOT Mysql
root@mailx:/etc/postfix# cp /etc/dovecot/conf.d/auth-sql.conf.ext{,.ori}
root@mailx:/etc/postfix# vi /etc/dovecot/conf.d/auth-sql.conf.ext

# Le mot de passe est obtenu à partir de la base de donnée
passdb {
 driver = sql
 args = /etc/dovecot/dovecot-sql.conf.ext
}
# Par contre le nom d'utilisateur est o
btenu de manière statique à partir du conteneur local
# %d = domaine.tld
# %n = utilisateur
userdb {
 driver = static
 args = uid=vmail gid=vmail home=/var/mail/vhosts/%d/%n
}
Configurer DOVECOT Mysql Connexion
root@mailx:/etc/postfix# cp /etc/dovecot/dovecot-sql.conf.ext{,.ori}
root@mailx:/etc/postfix# vi /etc/dovecot/dovecot-sql.conf.ext

# Paramètres de connexion
driver = mysql
connect = host=127.0.0.1 dbname=postfix user=postfix password=VOTRE_MOT_PASSE_POSTFIX

# Permet de définir l'algorithme de hachage.
# Pour plus d'information: http://wiki2.dovecot.org/Authentication/PasswordSchemes
# /!\ ATTENTION : ne pas oublier de modifier le paramètre $CONF['encrypt'] de PostfixAdmin
default_pass_scheme = MD5-CRYPT

# Requête de récupération du mot de passe du compte utilisateur
password_query = SELECT password FROM postfix_mailbox WHERE username = '%u'
Ajustement des droits
root@mailx:/etc/postfix# chown -R vmail:dovecot /etc/dovecot
root@mailx:/etc/postfix# chmod -R o-rwx /etc/dovecot
Activer Port 993 DOVECOT
root@mailx:/etc/postfix# cp /etc/dovecot/conf.d/10-master.conf{,.ori}
root@mailx:/etc/postfix# vi /etc/dovecot/conf.d/10-master.conf

service imap-login {
 inet_listener imap {
 port = 143
 }

 inet_listener imaps {
 port = 993
 ssl = yes
 }

 service_count = 0
}

service imap {
}

service lmtp {
 # On autorise Postfix à transférer les emails dans le spooler de Dovecot via LMTP
 unix_listener /var/spool/postfix/private/dovecot-lmtp {
 mode = 0600
 user = postfix
 group = postfix
 }
}

service auth {
 # On autorise Postfix à se connecter à Dovecot via LMTP
 unix_listener /var/spool/postfix/private/auth {
 mode = 0666
 user = postfix
 group = postfix
 }

 # On indique à Dovecot les permissions du conteneur local
 unix_listener auth-userdb {
 mode = 0600
 user = vmail
 group = vmail
 }

 user = dovecot
}

service auth-worker {
 user = vmail
}
Configurer DOVECOT SSL
root@node01-mail:/etc/dovecot# vi /etc/dovecot/conf.d/10-ssl.conf

ssl = required
ssl_cert = </etc/ssl/certs/mailserver.crt
ssl_key = </etc/ssl/private/mailserver.key
ssl_protocols = !SSLv3
ssl_cipher_list = ALL:!aNULL:!eNULL:!LOW:!MEDIUM:!EXP:!RC2:!RC4:!DES:!3DES:!MD5:!PSK:!SRP:!DSS:!AECDH:!ADH:@STRENGTH
ssl_prefer_server_ciphers = yes
ssl_dh_parameters_length = 2048
Démarrer DOVECOT et POSTFIX
root@mailx:/etc/postfix# service postfix restart
root@mailx:/etc/postfix# service dovecot restart
root@mailx:/etc/postfix# apt install net-tools
root@mailx:/etc/postfix# netstat –ptna

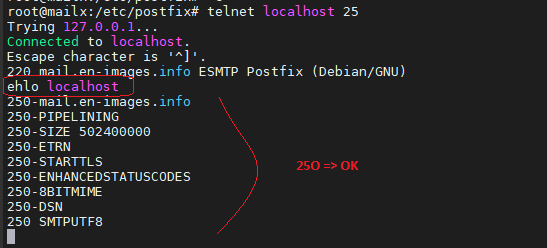
Test SMTP accès
root@mailx:/etc/postfix# telnet localhost 25
Test envoi mail via SMTP
root@mailx:/etc/postfix# apt install bsd-mailx
root@mailx:/etc/postfix# echo "tutut"| mail -s "test" chris@en-images.info < /etc/hosts
Côté /var/log/mail.log

« Successful »
Côté /var/mail/vhosts/en-images.info/chris/
root@mailx:/etc/postfix# du -a /var/mail/vhosts/en-images.info/chris/

Activer les Règles Firewall pour le Serveur de Mail
root@mailx:/etc/postfix# iptables -A INPUT -p tcp --dport 993 -j ACCEPT
root@mailx:/etc/postfix# iptables -A INPUT -p tcp --dport 587 -j ACCEPT
root@mailx:/etc/postfix# iptables -A INPUT -p tcp --dport 143 -j ACCEPT
root@mailx:/etc/postfix# iptables -A INPUT -p tcp --dport 995 -j ACCEPT
root@mailx:/etc/postfix# iptables -A INPUT -p tcp --dport 25 -j ACCEPT

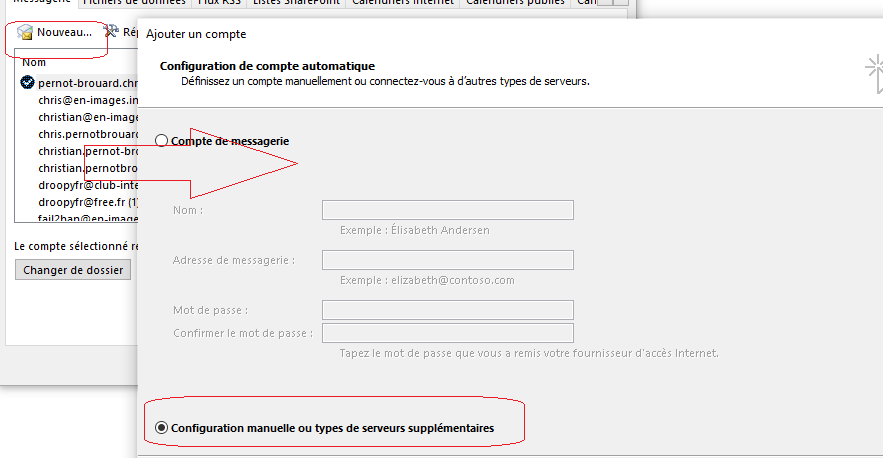
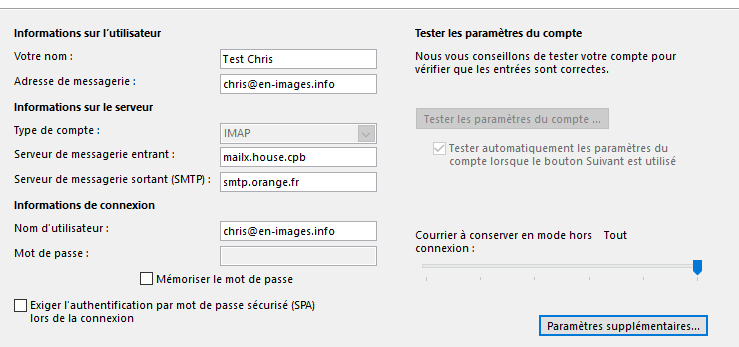
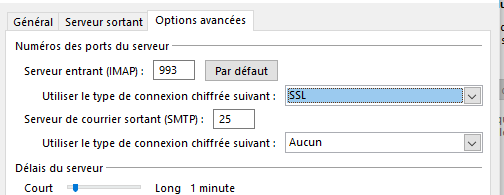
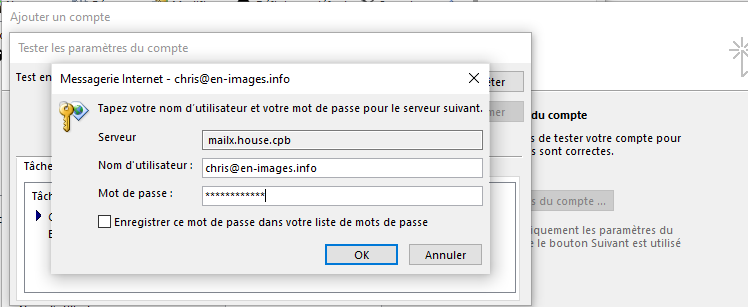
15°) Paramètrage Client Mail (Outlook)
On récupère bien les deux mails stockés sur /var/mail/vhosts/en-images.info/chris/

16°) Installation KEY DKIM (DNS OVH => Serveur de mail)
root@mailx:/etc/postfix# apt-get install opendkim opendkim-tools
root@mailx:/etc/postfix# cp /etc/opendkim.conf{,.ori}
root@mailx:/etc/postfix# vi /etc/opendkim.conf

AutoRestart Yes
AutoRestartRate 10/1h
UMask 002
Syslog Yes
SyslogSuccess Yes
LogWhy Yes

OversignHeaders From
AlwaysAddARHeader Yes
Canonicalization relaxed/simple

ExternalIgnoreList refile:/etc/opendkim/TrustedHosts
InternalHosts refile:/etc/opendkim/TrustedHosts
KeyTable refile:/etc/opendkim/KeyTable
SigningTable refile:/etc/opendkim/SigningTable

Mode sv
PidFile /var/run/opendkim/opendkim.pid
SignatureAlgorithm rsa-sha256

UserID opendkim:opendkim
Socket local:/var/spool/postfix/opendkim/opendkim.sock
Configuration DKIM => Postfix
root@mailx:/etc/postfix# mkdir /var/spool/postfix/opendkim
root@mailx:/etc/postfix# chown opendkim: /var/spool/postfix/opendkim
root@mailx:/etc/postfix# usermod -aG opendkim postfix
root@mailx:/etc/postfix# vi /etc/postfix/main.cf

#######################
# OPENDKIM
######################
milter_protocol = 6
milter_default_action = accept
smtpd_milters = unix:/opendkim/opendkim.sock, unix:/clamav/clamav-milter.ctl
non_smtpd_milters = unix:/opendkim/opendkim.sock
Configuration des « True » Host
root@mail001:/etc# mkdir -p /etc/opendkim/keys
root@mailx:/etc/postfix# vi /etc/opendkim/TrustedHosts

127.0.0.1
localhost
::1
*.en-images.info
Configuration des tables des Keys
root@mailx:/etc/postfix# vi /etc/opendkim/KeyTable

mail._domainkey.en-images.info en-images.info:mail:/etc/opendkim/keys/en-images.info/mail.private
Configuration des tables Signés
root@mailx:/etc/postfix# vi /etc/opendkim/SigningTable
*@en-images.info mail._domainkey.en-images.info
Création de la KEY DKIM
root@mailx:/etc/postfix# cd /etc/opendkim/keys
root@mailx:/etc/opendkim/keys# mkdir en-images.info && cd en-images.info
root@mailx:/etc/opendkim/keys/en-images.info# opendkim-genkey -s mail -d en-images.info -b 1024
root@mailx:/etc/opendkim/keys/en-images.info# chown opendkim:opendkim mail.private
Redémarrage des Services
root@mailx:/etc/opendkim/keys/en-images.info# service postfix restart
root@mailx:/etc/opendkim/keys/en-images.info# service dovecot restart
root@mailx:/etc/opendkim/keys/en-images.info# service opendkim restart

root@mailx:/etc/opendkim/keys/en-images.info# systemctl enable postfix
root@mailx:/etc/opendkim/keys/en-images.info# systemctl enable dovecot
root@mailx:/etc/opendkim/keys/en-images.info# systemctl enable opendkim
17° ) Ajouter un champ SPF dans le DNS OVH

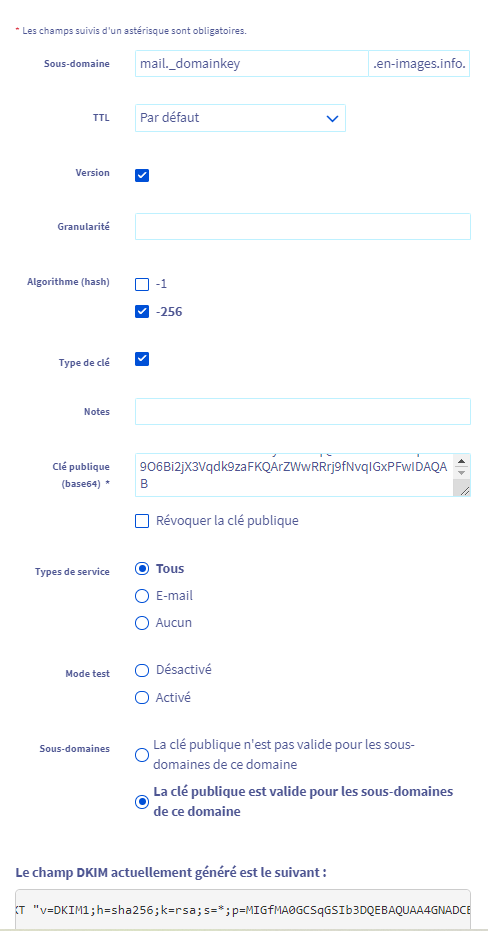
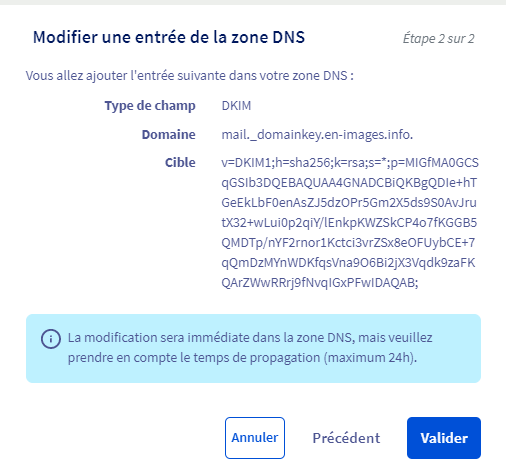
Ajouter un champ DKIM dans le DNS OVH
Liste la KEY Public à copier dans la Zone DNS OVH
root@mailx:/etc/opendkim/keys/en-images.info# cat /etc/opendkim/keys/en-images.info/mail.txt

Copier la KEY et ajouter celle-ci au champ DKIM d’OVH

Test Mail avec Cetificat DKIM via DNS OVH
root@mailx:/etc/opendkim/keys/en-images.info# echo "tutut"| mail -s "test" chris@en-images.info

18°) Installation SPAMASSASSIN ( Anti SPAM )
root@mailx:/etc/opendkim/keys/en-images.info# apt-get install spamassassin spamc
Ajout des règles pour le traitement avec SPAMASSASSIN
root@mailx:/etc/opendkim/keys/en-images.info# vi /etc/postfix/master.cf

smtp inet n - y - - smtpd
-o content_filter=spamassassin

submission inet n - y - - smtpd
 -o syslog_name=postfix/submission
 -o smtpd_tls_dh1024_param_file=${config_directory}/dh2048.pem
 -o smtpd_tls_security_level=encrypt
 -o smtpd_sasl_auth_enable=yes
 -o smtpd_client_restrictions=permit_sasl_authenticated,reject
-o content_filter=spamassassin
A la fin du fichier
spamassassin unix - n n - - pipe
 user=debian-spamd argv=/usr/bin/spamc -f -e /usr/sbin/sendmail -oi -f ${sender} ${recipient}
Configuration SPAMASSASSIN
root@mailx:/etc/opendkim/keys/en-images.info# vi /etc/spamassassin/local.cf

rewrite_header Subject *****SPAM*****
A la fin du fichier
report_safe 0
whitelist_auth *@en-images.info
add_header all Report _REPORT_
add_header spam Flag _YESNOCAPS_
add_header all Status _YESNO_, score=_SCORE_ required=_REQD_ tests=_TESTS_ autolearn=_AUTOLEARN_ version=_VERSION_
add_header all Level _STARS(*)_
add_header all Checker-Version SpamAssassin _VERSION_ (_SUBVERSION_) on _HOSTNAME_
root@mailx:/etc/opendkim/keys/en-images.info# systemctl enable spamassassin
root@mailx:/etc/opendkim/keys/en-images.info# systemctl start spamassassin
root@mailx:/etc/opendkim/keys/en-images.info# crontab –e

20 02 * * * /usr/bin/sa-update

# Auto-apprentissage de spam assassin
30 02 * * * /usr/bin/sa-learn --ham /var/mail/vhosts/domain.tld/utilisateur/mail/cur/*
40 02 * * * /usr/bin/sa-learn --spam /var/mail/vhosts/domain.tld/utilisateur/mail/.Junk/cur/*
19°) Installation SIEVE (Email Filtering Language)
root@mailx:/etc/opendkim/keys/en-images.info# apt-get install dovecot-sieve dovecot-managesieved
root@mailx:/etc/opendkim/keys/en-images.info# vi /etc/dovecot/dovecot.conf

!include_try /usr/share/dovecot/protocols.d/*.protocol
protocols = imap lmtp sieve
listen = *
!include conf.d/*.conf
Configuration lmtp
root@mailx:/etc/opendkim/keys/en-images.info# vi /etc/dovecot/conf.d/20-lmtp.conf

protocol lmtp {
 postmaster_address = postmaster@en-images.info
 mail_plugins = $mail_plugins sieve
}
Configuration SIEVE
root@mailx:/etc/opendkim/keys/en-images.info# vi /etc/dovecot/conf.d/90-sieve.conf

plugin {
sieve = /var/mail/vhosts/%d/%n/.dovecot.sieve
sieve_default = /var/mail/sieve/default.sieve
sieve_dir = /var/mail/vhosts/%d/%n/sieve
sieve_global_dir = /var/mail/sieve
}
Création de directory SIEVE et Définition Filtre
root@mailx:/etc/opendkim/keys/en-images.info# mkdir /var/mail/sieve/
root@mailx:/etc/opendkim/keys/en-images.info# touch /var/mail/sieve/default.sieve && chown -R vmail:vmail /var/mail/sieve
root@mailx:/etc/opendkim/keys/en-images.info# vi /var/mail/sieve/default.sieve

require ["fileinto"];
if header :contains "Subject" "*****SPAM*****" {
fileinto "Junk";
}
Lancement du Service SIEVE
root@mailx:/etc/opendkim/keys/en-images.info# sievec /var/mail/sieve/default.sieve
root@mailx:/etc/opendkim/keys/en-images.info# service dovecot restart
20°) Installation CLAMAV Antivirus
root@mailx:/etc/opendkim/keys/en-images.info# apt-get install clamav-milter
root@mailx:/etc/opendkim/keys/en-images.info# service clamav-freshclam stop
root@mailx:/etc/opendkim/keys/en-images.info# freshclam
root@mailx:/etc/opendkim/keys/en-images.info# service clamav-freshclam start
root@mailx:/etc/opendkim/keys/en-images.info# mkdir /var/spool/postfix/clamav
root@mailx:/etc/opendkim/keys/en-images.info# chown clamav /var/spool/postfix/clamav

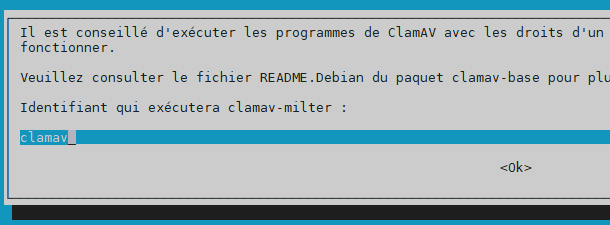

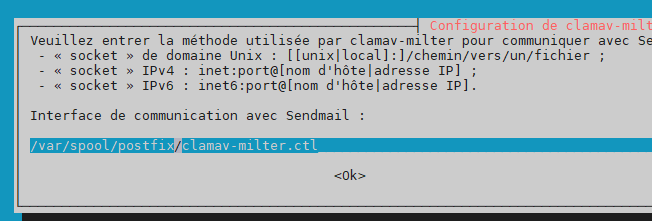


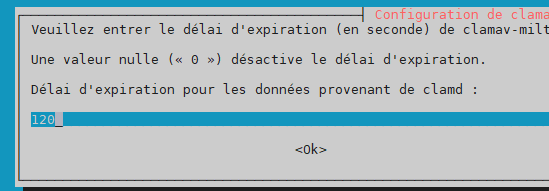


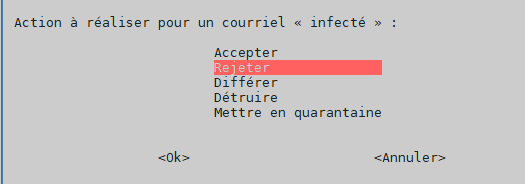


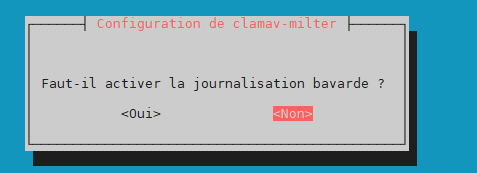


Handle configuration automatically –> yes
User for daemon –> clamav
Additional groups –> laisser le champ vide
path to socket –> /var/spool/postfix/clamav/clamav-milter.ctl
group owner for the socket –> clamav
permissions (mode) for socket –> 666
remove stale socket –> yes
wait timeout for clamd –> 120
foreground –> no
chroot –> laisser le champ vide
pid file –> /var/run/clamav/clamav-milter.pid
temporary path –> /tmp
clamd socket –> unix:/var/run/clamav/clamd.ctl
hosts excluded for scanning –> laisser le champ vide
mail whitelist –> laisser le champ vide
action for « infected » mail –> reject
action on error –> defer
reason for rejection –> Rejecting harmful e-mail: %v found.
headers -> replace
log file –> /var/log/clamav/clamav-milter.log
disable log file locking –> no
maximum log file size –> 50
log time –> yes
use syslog –> no
log facility (type of syslog message) –> LOG_LOCAL6
verbose logging –> no
log level when infected –> off
log level when no threat –> off
size limit for scanned messages –> 25
support multiple recipients –> no
enable log rotation –> yes
root@mailx:/etc/opendkim/keys/en-images.info# service clamav-daemon restart
root@mailx:/etc/opendkim/keys/en-images.info# crontab –e

15 * * * * /usr/bin/freshclam –quiet
root@mailx:/etc/opendkim/keys/en-images.info# vi /etc/postfix/main.cf

smtpd_milters = unix:/opendkim/opendkim.sock, unix:/clamav/clamav-milter.ctl
root@mailx:/etc/opendkim/keys/en-images.info# service postfix reload
21°) Installation POP3
root@mailx:/etc/opendkim/keys/en-images.info# apt-get install dovecot-pop3d
Activation Port POP3 Dovecot
root@mailx:/etc/opendkim/keys/en-images.info# vi /etc/dovecot/dovecot.conf

protocols = imap lmtp sieve pop3
root@mailx:/etc/opendkim/keys/en-images.info# vi /etc/dovecot/conf.d/10-master.conf

service pop3-login {
 inet_listener pop3 {
 port = 110
 }

 inet_listener pop3s {
 port = 995
 ssl = yes
 }
}

service pop3 {
}
root@mailx:/etc/opendkim/keys/en-images.info# service dovecot restart
root@mailx:/etc/opendkim/keys/en-images.info# netstat -ptna | grep -i "0.0.0.0:110\|0.0.0.0:995

root@mailx:/etc/opendkim/keys/en-images.info# vi /etc/postfix/header_checks

/^Received:.*with ESMTPSA/ IGNORE
/^X-Originating-IP:/ IGNORE
/^X-Mailer:/ IGNORE
/^User-Agent:/ IGNORE
root@mailx:/etc/opendkim/keys/en-images.info# vi /etc/postfix/main.cf

################
## CACHER HEADER
################
mime_header_checks = regexp:/etc/postfix/header_checks
header_checks = regexp:/etc/postfix/header_checks
root@mailx:/etc/opendkim/keys/en-images.info# postmap /etc/postfix/header_checks
root@mailx:/etc/opendkim/keys/en-images.info# postfix reload
root@mailx:/etc/opendkim/keys/en-images.info# service postfix restart
Views: 185


